Before ATEasy can access external interfaces on your computer, you must define and configure interfaces. These interfaces include GPIB and VXI. Other interfaces, such as COM ports, are built-in and do not require any further action.
Before defining an interface, you must install the interface board on your computer and install the vendor software driver. ATEasy uses the vendor driver to configure and use the interface board.
In this example, we will be using the National Instruments GPIB board. If you have a different type of board, the choices and displays may be slightly different.
1. Select Options from the Tools menu.
2. Select the Interfaces page.
3. Select Gpib from the interface list and click Add. The Gpib Interface dialog appears.
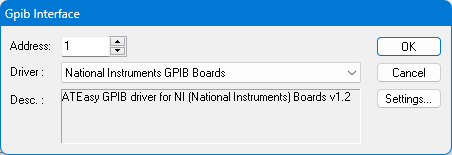
4. Set the Address to be 1 (default). This address will be used by your application to access the GPIB Board. Select the GPIB interface vendor. In our example, select National Instruments from the combo box as shown here:
Note: If the Description text does not indicate the driver version as shown here, an error message will be displayed in the text box. If an error is displayed, make sure the vendor driver is installed properly and resides in the ATEasy folder, Windows or Windows System directory, or in the Windows PATH directories.
5. Click Settings. The National Instruments GPIB Boards dialog box appears as shown below. In this image the Interface number was set to 0 representing the GPIB0 board:
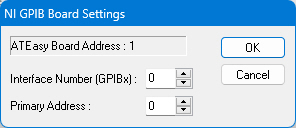
This is a vendor specific dialog box.
For National Instruments, set the board index as configured by the National Instrument GPIB control panel applet: 0 for GPIB0, 1 for GPIB1, etc. If you have only one GPIB board from National Instruments this is set to 0 by default. The GPIB number assigned to the interface is assigned using the manufacturer software (for example NI MAX for National Instruments) .
The primary address is the device GPIB address that ATEasy uses to access the board. Typically, it is set to 0, unless you have a device already using that address.
Click OK to close this dialog.
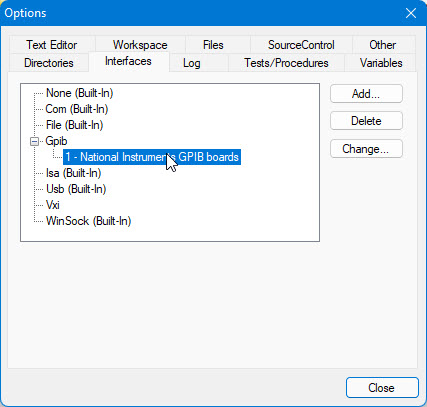
6. Click OK again to return to the Interfaces dialog box. Your screen should now look like the following:
7. Click Close to return to the IDE main window. Your interface is now configured and ready to use.