 from the Insert menu or from the
Standard toolbar. A new I/O table called IOTable1
has been created.
from the Insert menu or from the
Standard toolbar. A new I/O table called IOTable1
has been created.I/O Tables perform a variety of functions. The first thing you will work with is writing data to an instrument. The I/O table you create here will be used to set the DMM to VDC (Volts DC) measurement mode. To do so, you need to send a string to the DMM instructing it to change its measurement mode to VDC. For that, you need one output operation, and one send operation.
1. Select the IOTables submodule from the tree view in the Document View of the MyDMM driver.
2. Select Insert
IoTable
from the Insert menu or from the
Standard toolbar. A new I/O table called IOTable1
has been created.
3. Rename the I/O Table by typing SetFunctionVDC.
4. Type the following description for this operation in the description view: Sets the measurement function to VDC.
Your screen should now look like the following:
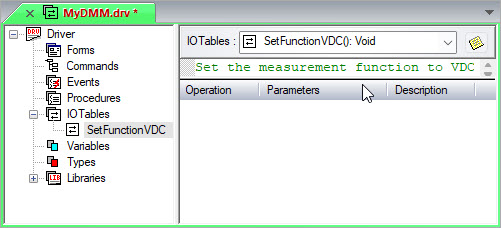
The I/O Table object view displayed at the right side contains a combo box showing a list of the module I/O Tables (the current I/O Table is shown when the list is collapsed). The area below is used for the current I/O Table description, and the lower area contains a list showing the current I/O Table operations.
1. With the I/O Table SetFunctionVDC
selected, right-click on the operations view and select Insert
IoOperation After ![]() from the context menu. An Output operation is created.
from the context menu. An Output operation is created.
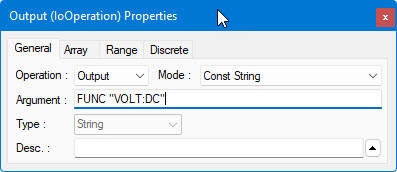
2. Right-click on the Output operation and select Properties ![]() .
You need to enter a string into the Argument field to designate the VDC
mode. Enter the following string required by the DMM for VDC mode:
.
You need to enter a string into the Argument field to designate the VDC
mode. Enter the following string required by the DMM for VDC mode:
FUNC "VOLT:DC"
The HP 34401 user's guide specifies that this is the string to be sent in order to set up the instrument for VDC measurement mode. No other changes are required as the default mode of the Output operation is Const String (Constant String). Your properties window should look like the following:
The Output operation you just inserted appends the string to the output buffer. However, you need to transmit the buffer content to the DMM. To send the data over the GPIB bus, you need to add a Send Operation.
1. Right-click on the Output operation in the operations
view and select Insert IoOperation After
![]() from the context menu. A new Output operation is
created.
from the context menu. A new Output operation is
created.
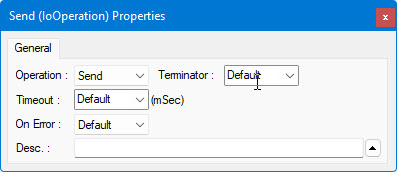
2. Right-click on the new Output operation and select
Properties ![]() . In the properties dialog box, select Send
from the Operation combo box.
No other changes are required. Your screen should now look similar to
the following:
. In the properties dialog box, select Send
from the Operation combo box.
No other changes are required. Your screen should now look similar to
the following:
The operations view now shows two operations: Output, followed by the Send operation. Your I/O table is now completed and is ready to use.