from the Insert menu or from the
Standard toolbar. ATEasy displays a list
of available drivers. By default, ATEasy
drivers are installed in the Drivers folder below the main ATEasy
folder.
from the Insert menu or from the
Standard toolbar. ATEasy displays a list
of available drivers. By default, ATEasy
drivers are installed in the Drivers folder below the main ATEasy
folder.In this section, you will create a new driver. Typically, if you already have the driver for your instrument, you will only need to add and configure it for your system before using it. In this example, you will be developing a new driver for the Keysight 34410a Digital Multimeter GPIB instrument. For reference, you will add the Ag3441x.drv, which is supplied with ATEasy, to your system.
1. Select the Drivers submodule below the System module in the Workspace Window.
2. Select
Insert Driver
Below
from the Insert menu or from the
Standard toolbar. ATEasy displays a list
of available drivers. By default, ATEasy
drivers are installed in the Drivers folder below the main ATEasy
folder.
3. Select Ag3441x.drv and click Open. ATEasy loads the driver and names a driver shortcut as DMM. This driver is for a Keysight/Agilent/HP GPIB based Digital Multimeter (DMM). The document view for the driver opens in the client area.
4. Right-click
on the Drivers submodule below
the System module in the Workspace
Window and select New Driver  from the context menu. ATEasy adds a
new driver and names the driver shortcut Driver1.
The document view for the new driver opens in the client area.
from the context menu. ATEasy adds a
new driver and names the driver shortcut Driver1.
The document view for the new driver opens in the client area.
5. Click
on the Save All  command from the file menu and save the new driver
(Driver1) to MyDMM in the MyProject
folder. Notice that ATEasy renamed the
shortcut from Driver1 to MyDMM.
command from the file menu and save the new driver
(Driver1) to MyDMM in the MyProject
folder. Notice that ATEasy renamed the
shortcut from Driver1 to MyDMM.
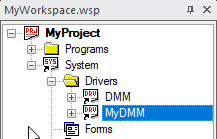
At this point, you should have two drivers below the system Drivers submodule as displayed here: |
|