In this example, create a driver, MyGx6138.drv, which uses a DLL GXSW.DLL. The driver is similar to the GX6138.drv driver for the 38 Relay (switching) board from Marvin Test Solutions that is part of the GXSW package that can be download from Marvin Test Solutions web site. We will create ATEasy DLL procedure to describe the procedures residing in the DLL. These procedures will be used to program the GX6138 board. For reference, you will also add the GX6138.drv driver that is provided in the ATEasy Drivers folder.
1. Right-click
on the Drivers submodule in MySystem.
Select the New Driver ![]() command from
the context menu. A new driver is created. Rename the driver's name to
MyRELAY from the workspace window.
command from
the context menu. A new driver is created. Rename the driver's name to
MyRELAY from the workspace window.
2. Right-click
on Libraries submodule and select
Insert Library Below  from the context menu. The Insert Library dialog is displayed.
This dialog is used to insert a Type Library, a .NET assembly, or a DLL.
from the context menu. The Insert Library dialog is displayed.
This dialog is used to insert a Type Library, a .NET assembly, or a DLL.
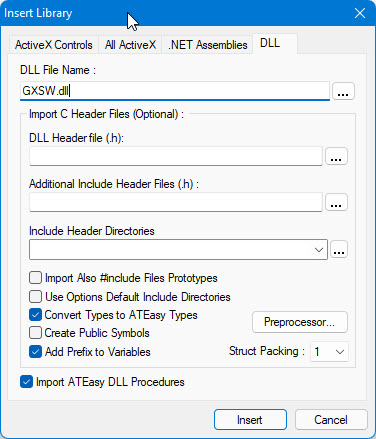
3. Activate the DLL tab and click on the Browse button. The Select File dialog appears.
4. Select
GXSW.DLL from the Windows System folder (Windows\SysWOW64 folder on 64-bit
Windows, or, Windows\System32 folder under 32-bit Windows) and click Open. Alternatively, you can type
GXSW.dll, ATEasy
will find it since it’s in the Windows default search path for DLLs. The
DLL file name is now displayed in the edit box as shown here:
5. Click
Insert. A GXSW
library is added under the new driver Libraries
submodule with the default name of GXSW.
NOTE: The Import C Header Files fields will be used later in this chapter
to import the DLL procedures, for now, we will declare these procedures
manually.
6. Right-click
on the library and select Properties
![]() from the context menu. The library properties
page is displayed. Check the Public
checkbox. By default, DLL procedures are attached to commands and need
not be public. Since you will be using the DLL procedure within the program,
you should make it public so other modules can use the procedure.
from the context menu. The library properties
page is displayed. Check the Public
checkbox. By default, DLL procedures are attached to commands and need
not be public. Since you will be using the DLL procedure within the program,
you should make it public so other modules can use the procedure.
7. Right-click
on the Drivers submodule and select
Insert Driver Below from the context menu. The Insert
Driver dialog displays. Select GX6138.drv
from the ATEasy Drivers folder and click
Open. The GX6138 driver will be
inserted to the system type with a name of RELAY
for the driver shortcut (taken from the driver default name property).
8. Before
you use the RELAY driver, you must configure its interface. Right-click
on the Driver Shortcut symbol in the Workspace window and select Properties ![]() .
The Driver properties appear. Activate the Misc
page. Select the Slot, type in
the GX6138 PXI slot number as appears in the PXI-PCI
Explorer application. The PXI-PCI explorer can be start by selecting it
from the MarvinTest, HW
from the Windows Start menu. The Misc
page should display as shown here:
.
The Driver properties appear. Activate the Misc
page. Select the Slot, type in
the GX6138 PXI slot number as appears in the PXI-PCI
Explorer application. The PXI-PCI explorer can be start by selecting it
from the MarvinTest, HW
from the Windows Start menu. The Misc
page should display as shown here:
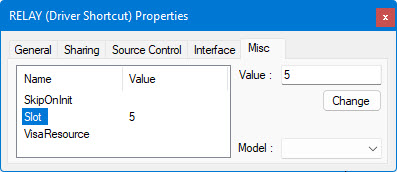
9. The Slot parameter is used to supply the driver with PXI slot number used when initializing the board. The SkipOnInit parameter will be used to signal the driver to not initialize the driver when the driver OnInit event is called, leaving it empty will cause the driver to be initialized when you start running the application. The parameters can be retrieved by the driver using the Driver.Parameters("Slot") expression. This driver uses DLL to communicate with the instrument and does not use I/O Table to communicate with the instrument and therefore they have the None driver interface (default for new drivers).
10. Click
Save All  to save your work. When prompted save the new driver to MyGx6138.drv
in the MyProject folder.
to save your work. When prompted save the new driver to MyGx6138.drv
in the MyProject folder.
Once the library is added to the driver, you need to define the procedures residing in the DLL since a DLL does not contain type information about its procedures. To define these procedures, you need to look into the DLL documentation or use the C programming language header file that is sometimes provided with the DLL. Your next step will be to declare the procedures under the library you just inserted. Before you start, let’s look at the GXSW.DLL header file.