 from the context
menu. A new Form called Form1 has been created.
from the context
menu. A new Form called Form1 has been created.The first step in the form development process is to create the form. In this example, you will create a form within an ATEasy Program. Forms can also be created under other ATEasy modules such as System or Drivers.
1. Right-click
on the Forms submodule under MyProgram and select Insert
Form Below from the context
menu. A new Form called Form1 has been created.
Creating the new form causes ATEasy to display the Form View as shown here:
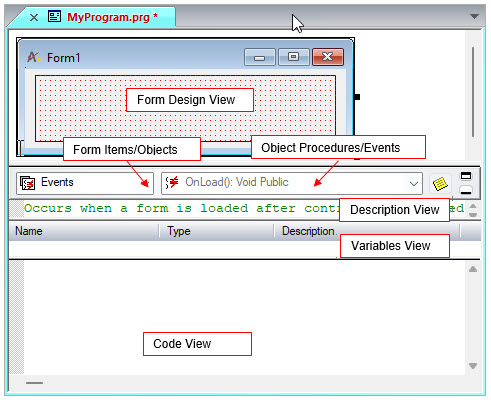
The top pane of the form view contains the Form Design View showing
the form and its controls and menus. A grid used for control alignment
is shown on the form client area; in addition, blue margin lines are shown
on the form. The margin is used to limit the area where controls can be
placed using a mouse on the form. The grid can be adjusted by using the
Grid and Margins ![]() command below the Arrange command on the Edit
menu. The Margins can be also dragged using the mouse to adjust the distance
from the form border.
command below the Arrange command on the Edit
menu. The Margins can be also dragged using the mouse to adjust the distance
from the form border.
The area below the form design view displays two drop-down lists. The left drop-down list shows the Form Items that can be edited including the form events, procedures, and variables, as well as the controls and menus included in the form. Selecting an item from the Items drop-down list will refresh the second drop-down list and displays the procedures of the selected item. Selecting a procedure from the Procedures combo box makes that procedure the current procedure.
The area below the combo box controls displays the current procedure description, variables and parameters, and the procedure code.