Before you can continue, you need to change some of the properties of the controls. One property to change is the name of the control. ATEasy assigns default names to Controls such as btn1, btn2, etc. Controls must have different names for ATEasy to be able to access them individually. Since the default names do not mean much, you should change them to a meaningful name describing the Control's use. However, you should keep the prefix to have standard naming conventions and to be able to distinguish between different types of Controls.
As an example, you should use the prefix "btn" for all Button Controls. This way, when you see a reference in the program to MyForm.btnClose, you know it refers to a Button Control probably called "Close."
1. Double-click on btn1 to display its properties. The button property page displays.
2. On the General properties page, change the Name to btnClose.
3. Check the Default checkbox to make the button the default button. Selecting default causes the button to be pressed when the user presses the ENTER key (and performs the procedure assigned to that button). Only one button in a form can be designated the default. Notice that the page also has a Cancel check box. This designates a button to be a cancel button accepting the ESC key when the form is active as the user pressed the button. This is usually used for a Cancel button on a form.
4. Click on the Control page to activate the page. Change the Caption to Close. Change the Font3D property to 1 - raised w./light shading. This sets a unique look to the font text on the buttons in your form.
5. Select btn2 and repeat step two, changing the Name to btnAcquire.
6. Repeat step four for btn2, changing the Caption to &Acquire. Adding the "&" in front of a character allows the user to press ALT and the character immediately following the "&" to select the button. The user can select buttons with one key stroke instead of either using the mouse or pressing Tab until the control (button) has focus and then pressing the space bar to press the button. Note the A now appears underlined (A) in the form.
Note: If you want to select a character other than the first character of a button (such as in the case that you have two buttons with the same first letter, for example, Acquire and Add), you may place the "&" immediately in front of the character to use with the ALT key. For example, to use the first "d" of Add, you would enter A&dd. ALT + D would trigger the button, and the text on the button face would appear as Add.
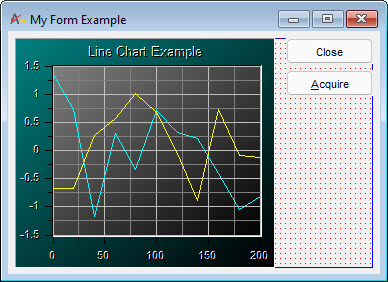
1. Select the chart and activate the General page. Change the control's Name to chtData.
2. Activate the Axes page. The page displays a list of all the axes available via a list box. Click on the X-axis in the list and set Max to 200. Click on the Y-axis and set the Min to -1.5 and the Max to 1.5. This causes the chart to display 200 samples (maximum) and the values of the data will be between -1.5 to 1.5.
3. Activate the Ticks page and change the X-Axis Spacing to 1 - By Division. Change the MajorDivision to 4 and the MinorDivision to 2. Do the same for the Y-axis, changing the Spacing to 1 - By Division, the MajorDivision to 6, and the MinorDivision to 2.
4. Activate the Plots
page and add a second plot by clicking on the New
button ![]() . Your chart will contain two plots, each displaying
its own data in a line on a chart. Name the second plot, Plot2. Move it
below Plot1 on the list by clicking the move down button
. Your chart will contain two plots, each displaying
its own data in a line on a chart. Name the second plot, Plot2. Move it
below Plot1 on the list by clicking the move down button ![]() . Change
the LineStyle and PointStyle
color to yellow, by using the color drop down button to the right of each
. Change
the LineStyle and PointStyle
color to yellow, by using the color drop down button to the right of each
![]() .
Each plot now displays in a different color Plot1
in cyan and Plot2 in yellow.
.
Each plot now displays in a different color Plot1
in cyan and Plot2 in yellow.
5. Change the background of the chart to green by activating the Colors page. Select BackColor from the Property Name list box and select green.
Your form should appear as below: