When LabVIEW Virtual Instrument files are imported, ATEasy procedures are created for each VI. This topic explains in detail how importing and calling LabVIEW Virtual Instrument works from ATEasy.
First, to use a VI or a LLB of VIs, you first use the Import LabVIEW Virtual Instrument File… command. This command is available from the ATEasy Insert menu when the module Procedures is selected. Once the Import LabVIEW Virtual Instrument dialog is opened and you have selected the VI, LLB or LVLIBP file, a list of VI is displayed. Each VI is displayed with its connectors bellow. ATEasy display a check box next to each VI and its connectors. Select the VI and it's connectors that you want to use and click on Import. This generates ATEasy procedures for each one of the VIs you have selected. A parameter is also created fro each connector. These procedures can be called like any other ATEasy procedures once they have been imported and created.
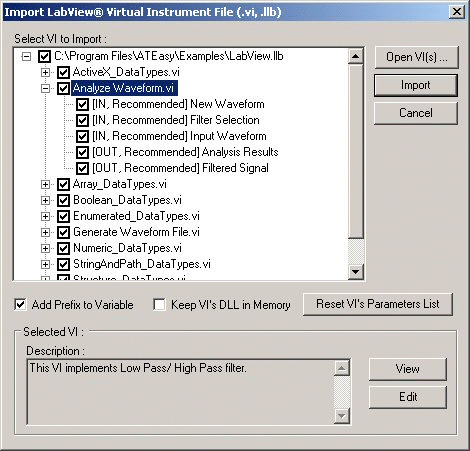
This is the dialog used to import - see the Import LabVIEW Virtual Instrument dialog for detail information:
The ATEasy internal library contains a GetVi(sViPath)
function that is used to return a COM object to the VI file name you specify.
If your VI resides inside a LLB, specify the LLB filename/VI file name
as if the LLB is a folder.
The function returns a VI COM object that is used to call a VI or perform
other actions on it. The available actions can be viewed if you insert
the LabVIEW type library using Insert Library. The object returned is
of type VirtualInstrument class
which has many methods and properties. ATEasy calls the Call2()
method to run the VI. If you look at the procedures generated by ATEasy
(by using the wizard as described above), you will see how it works. See
the LabVIEW.prg procedures for examples.
You do not need the LabVIEW development package to run a VI but you do need to have the exact LabVIEW run-time version that the VI/LLB was saved to. ATEasy Version 5 support LabVIEW 7.0-7.1 in ATEasy version 6, 8.0 and 8.2 and in ATEasy version 7, we added support for 8.5 and 8.6. The example created with ATEasy (LabVIEW.llb was created with LabVIEW 7.1).
Note that Virtual Instrument Files (.vi, .llb and .lvlibp) files are not forward compatible and requires that the exact or newer version of that run-time installed in your system to be able to run them.
When you call a VI, ATEasy will look for its sub VI search path and the LabVIEW default directory in the INI file. These settings are saved to ALabViewHelper71.ini (or ALabViewHelper70.ini) in the ATEasy folder. The file has the following structure:
[ALabViewHelper71]
LibDir=C:\Program Files\National Instruments\ LabVIEW 7.1
ViSearchPath=
HideRootWindow=True
If your machine has LabVIEW fully installed, then ATEasy will take care of the INI file by filling in the correct directory. But if you have only LabVIEW run time installed, then it is the user's responsibility to set the setting correctly.
LabVIEW uses some data types that ATEasy does have a build in type. For such data types, ATEasy will create these type and add it to the module Types, for example:
VI_Refnum - typedef to DWORD
VI_structComplexNumber - struct
VI_Session - typedef to a struct
In the ATEasy Examples directory, see the LabVIEW.prj example which contains LabVIEW.prg with the imported LabVIEW library: LabVIEW.llb (also reside in the Examples folder).