Select the current instrument interface that is used in your system to control the instrument. You make the selection from the list of interfaces which you designated in the Interfaces Page of Driver Properties. The drop down list displays only the interfaces that were enabled in the driver.
Note Some ATEasy drivers are implemented as None interface and are not using the ATEasy interfaces to control the instrument instead they are using an external library (usually DLL). These include IVI, Function Panel drivers and LabVIEW drivers. In this case the driver is usually configured using parameters that can be entered in the Misc page.
Once you have selected your interface, additional options will appear allowing you to set the parameters associated with that interface.
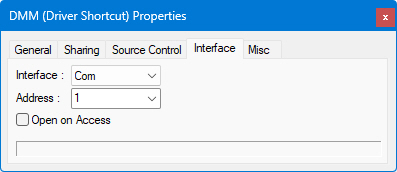
The COM interface controls serial communication to and from devices.
● Address is defined as the COM port number, which can be from 1 to 256 (COM 1–COM 256).
● Open on Access - the port will be opened when you try to use it, either when sending or when receiving data to/from the COM port.

The File interface controls reading data input from and writing data output to a file.
● File specifies the file that will be read from or written to. If this file name is empty, then the driver File Interface file name (in Driver Interfaces Properties Window) will be used (default file name). If the driver property and the driver shortcut property specify different file path names, this shortcut file path name will always be used.
● Open on Access - the file will be opened when you try to use it, either when writing or reading data into/from the file.
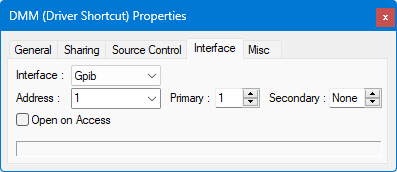
The GPIB interface controls settings for communication with instruments connected via the General Purpose Interface Bus (IEEE 488). The GPIB interface must be configured prior to running the application using the Interfaces Options Dialog
● Address is the GPIB board number (1–9).
● Pri is the GPIB instrument's Primary address (0–30).
● Sec is the GPIB instrument's Secondary address (0–30 or 'None' if not used).
● Open on Access - the port will be opened when you try to use it, either when sending or when receiving data.
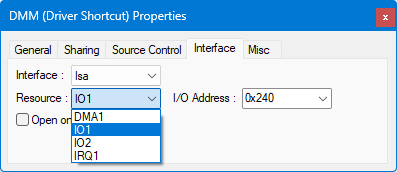
The ISA interface controls settings for communication with instruments connected via the ISA ("PC" ) Bus. ATEasy allows direct communication with the ISA bus via various resources it makes available: DMA channels, data lines, interrupt lines, and two "windows" on memory.
● Resource: Select the resource for the interface. The labelling of the Resource options with numbers at the end, such as DMA 1 to DMA 2, IO1 to IO8, IRQ1 to IRQ2, and MEM1 to MEM2 indicate "presets," and not the addresses themselves. The specific DMA settings, IO ports, interrupts, and memory addresses are set using the properties for each option.
● DMA: This field changes depending on the Resource selected.
Under the DMA settings, you can choose the DMA channel numbers you wish to use for the device, from 0 to 7.
If IO was selected as a resource, under the I/O settings, you can select a base address, increments for selecting a new base address, and the top address.
If IRQ was selected as a resource, under the IRQ settings, you can select single or multiple interrupts from 0 to 15. You should be careful not to select interrupts which conflict with other devices' interrupts. In particular, interrupt 13 is usually reserved for a math co-processor in older motherboards, so it is not brought out to the bus.
If MEM was selected as a resource, under the memory settings, you can select the base and top addresses of a range of memory, and the increment of a page of memory. This is especially useful when dealing with memory-mapped devices.
● Open on Access - the required ISA parameters will be checked when you try to use it.
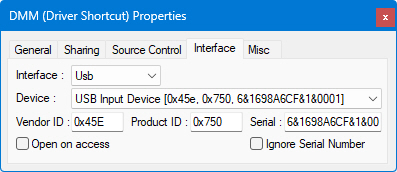
This page allows you to select a USB device. First you select one of USB device instances on the system. Then its Vendor ID and Product ID with Serial number (optional) will be retrieved for that device. Else if you know Vendor and Product ID and optionally its Serial Number (for instance you have more then one of such products), then you can enter them here.
● Open on Access - the device will be opened when you try to use it, no error will be generated if the device does not exist when the application is started (only when a read/write command is executed and the device does not exist)
● Ignore Serial Number - when checked, the Serial value will be ignored and the run time will attempt to associate a device with the exact vendor id/product id to this driver shortcut. If the serial is not checked (default), a run time error will be issued when the device with the exact serial number does not exist. This setting allows the run-time to use an instrument with same type but with different serial number.
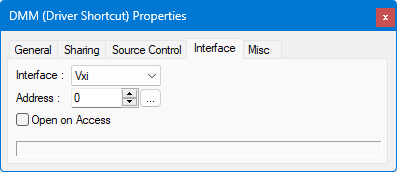
The VXI interface controls settings for communication with instruments connected via the VXI bus. The VXI interface must be configured prior to running the application using the Interfaces Options Dialog.
● Address is the VXI device's logical address (1–255) as displayed in the VXI resource manager provided by the VXI interface vendor.
● Open on Access - the device will be opened when you try to use it, either when sending or when receiving data to/from the device.
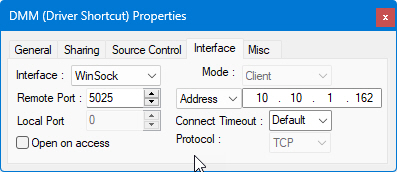
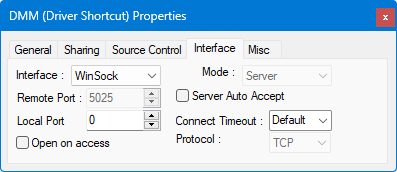
The Winsock interface allows for communication with servers and LXI instruments over TCP/IP, using either TCP, for guaranteed delivery of packets, or UDP, for connectionless non-regulated delivery.
● Mode: there are two modes: Client or Server - this allows ATEasy to listen on the port selected and act as a client or server, so that two-way communication can take place with the other machine acting as the other.
● Remote Port allows you to set a remote port on which communication will take place.
● Local Port allows you to set a "well-known" or non-standard port on which communication will take place.
● Name or IP number of the system with which you will be communicating.
● Connect Timeout is the number of milliseconds until a connection times out.
● Protocol can be TCP, a one-to-one, connection-oriented, reliable communications service, or UDP, a connectionless datagram service that guarantees neither delivery nor correct sequencing of delivered packets.
● Open on Access means that a port will be opened when you try to use it, either when sending or when receiving a packet.
● Server Auto Accept allows (if checked) for not Open on Access case to make Accept automatically after the OnInterface is called with enCause Accept without blocking in the background.