
The GxPs Calibration license string needs to be installed in order to activate and enable calibration option through the virtual front panel or through the driver function calls. The following procedure describes how to setup the calibration license:
Open the Panel application, About page:
GX7400 Virtual Panel – About Page
Click on the Calibration License… button to open the License Setup dialog:

GXPS-CAL License Setup Dialog
Request a license from Marvin Test Solutions. You may need to create or log into your magic account at http://www.MarvinTest.com/magic. Then create an incident requesting a license specifying your product serial number (as it appears on your purchase order or packing list) and the Computer Id shown in the License Setup dialog (in this example “C338 ECEE 05”.).
Once you receive the license string (by email), enter it to the edit box in the License Setup dialog along with your name and organization and click OK.
You can now test your installation by starting a panel program that let you control the board interactively. The panel program can be started by selecting it from the Start, Programs, Marvin Test Solutions and GXCNT menu located in the Windows Taskbar. In the virtual panel click the Initialize button, then click on the About tab. The Calibration By User... button should be enabled.
In order to calibrate the power supply board, the following list of instruments is required:
Calibrated multimeter with 6 1/2 digits
Alligator clip leads with AWG16 wire
Recommended Calibration Load
The following table lists the Calibration Recommended Load Range in order to ensure best results:
Best results are achieved when load values are close to the half of the module’s total output power. The load must either be cooled properly, or thermal-coefficient resistors must be used.
Module type |
Output Voltage range |
Calibration Recommended Load Range |
GT7415 |
0-15V @ 10A Programmable Power Supply module |
7.5W ± 5% @ 75Watt |
GT7430 |
0-30V @ 5A Programmable Power Supply module |
12W ± 5% @ 75Watt |
GT7460 |
0-60V @ 2.5A Programmable Power Supply module |
48W ± 5% @ 75Watt |
GT7420-03 |
3.3V @10A fixed PS module |
1.65W ± 5% @ 16.5Watt |
GT7420-05 |
5V @10A fixed PS module |
1W ± 5% @ 25Watt |
GT7420-12 |
12V @8.4A fixed PS module |
2.85W ± 5% @ 50Watt |
GT7420-15 |
15V @7.6A fixed PS module |
4W ± 5% @ 56Watt |
GT7420-28 |
28V @3.6A fixed PS module |
15.5W ± 5% @ 50Watt |
The power supply outputs are routed through an on-board isolation relay, and include remote sensing capability. The following diagram demonstrates the GX7400 connector with a high-power load. The positive output voltage should be connected to the load with the positive sense line: the negative output voltage should be connected to the load with the negative sense line.
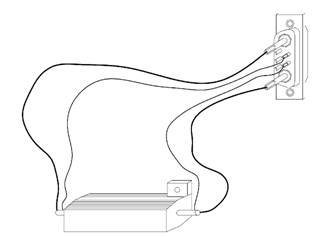
GX7400 connector with a high-power load
The following diagram shows the GX7400 front panel connectors.

GX7400 front panel connectors
The following diagram shows the front panel output connector of Channel 1 connected to the load.

GX7400 Channel 1 connected to the load