 .
The Insert Driver dialog appears as shown here:
.
The Insert Driver dialog appears as shown here:By now, you have run your first application in ATEasy. You would have noticed that the application that you ran did not have any user interface. The output it generated was displayed in the IDE's Log Window. As discussed in The Integrated Development Environment, when you use the Build command from the IDE, the project is compiled, and the result is an executable file that can be run independently of the IDE (like any Microsoft Windows application). The executable still needs a user interface. ATEasy, similar to other programming languages, supports building custom user interfaces, allowing you to design your own windows with controls and menus. These windows are called Forms and you can use them to design your own test executive. In this topic, we will use the TestExec.drv driver supplied with ATEasy to provide our application user interface. This driver will be added to the application system to provide a test executive for your application. In Working with Forms, you will design your own user interface.
1. From the workspace window, expand MyProject by clicking on the plus sign next to its image. Expand the System in a similar way and then select Drivers.
2. Right click on Drivers.
The Drivers context menu appears. Select the Insert
Driver Below command .
The Insert Driver dialog appears as shown here:
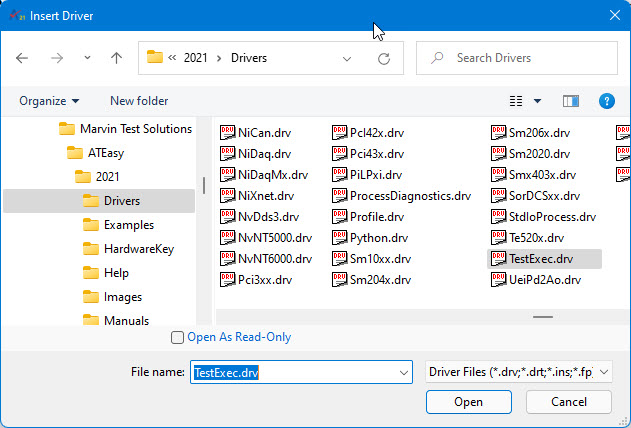
Note: If the window does not show any .drv file. Your Windows explorer is probably set the hide files that have the .drv extension. To show these files, Run the Windows Explorer and select Folder Options… from the View menu. Than, Click on the View tab and check the Show All Files option.
3. Select the TestExec.drv driver and click Open to insert the driver from the ATEasy Drivers folder, click Open to insert the driver. The driver is added to the Drivers folder within the system. In addition, a new document view is displayed in the IDE displaying the TestExec.drv. Note: After the TestExec driver is inserted, it can be disabled (without removing it from the System) by setting the Driver Shortcut Disable parameter to 1. To access the driver shortcut parameters page, right click on the TestExec in the Workspace window, select Properties and then click on the Misc page.
4. You may repeat steps 1-3 to insert the Profile.drv driver. The profile driver allows you to create and run profiles that enable you to run selected programs, tasks and tests in a custom sequence. The Profile driver must be inserted before the Test Executive driver (use Insert Driver At command when the TestExec driver is selected). Once this driver is inserted the test executive menu will show special commands that allow you to create, edit, select and run profiles saved in profile files.
5. You may repeat steps 1-3 to insert the FaultAnalysis.drv driver. The Fault Analysis driver allows you to create conditions that are based on the program test results. It is used by the operator to troubleshoot and recommend ways of fixing the UUT. The Fault Analysis must be inserted before the Test Executive driver (use Insert Driver At command when the TestExec driver is selected). Once this driver is inserted the test executive menu will show special commands that allow you to create, edit, and analyze conditions saved in a condition file.