 from the Insert menu or from the
standard toolbar. A new task and test are inserted below the Tests submodule.
from the Insert menu or from the
standard toolbar. A new task and test are inserted below the Tests submodule.Your first program contains one task (Power Tests) and two tests (PS1 and PS2). Define the test requirements by first defining the test type and filling up the test properties. Then, write some code in the test to tell ATEasy the test result. Consequently, when you run this program you will see actual test results.
The next step is to add tasks and tests that will be part of your program.
1. Activate the MyProgram document view and click on the Tests submodule in the tree view. If the document view is not visible, double-click on the MyProgram program shortcut.
2. Select Task/Test
Below
from the Insert menu or from the
standard toolbar. A new task and test are inserted below the Tests submodule.
The Tests view is shown here:
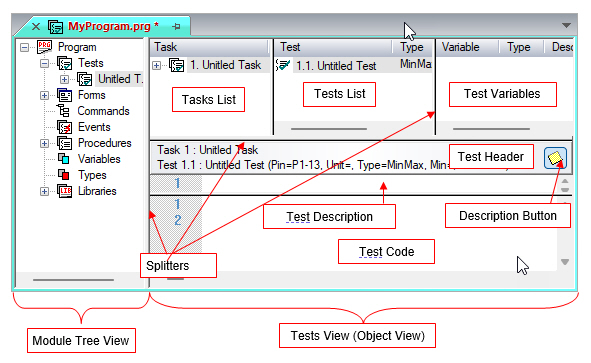
The Tests View displayed in the object view displays a split view with two horizontal splitters and one vertical splitter. The following areas are displayed as shown in the previous diagram:
● Tasks List – a tree view lists the tasks and tests comprising the program. Selecting a task in this view makes it the Current Task.
● Tests List – a list of all tests belonging to the selected task within the Tasks view. Selecting a Test in this view makes it the Current Test.
● Test Variables – current test variables. These variables are created and destroyed when a test starts and ends.
● Test Header – shows the current task name and number, as well as the current test name, type, and properties. The header also contains the Description Button used to show or hide the Test Description View.
● Test Description – a text editor where the current test description is entered. Optional line numbers are displayed to the left.
● Test Code – a text editor where the current test programming code is entered. Optional line numbers are displayed to the left.
1. Change the name of the task by clicking on the Untitled Task name and typing Power Tests. Note that if you clicked on the task image (icon) the tree view will not be in renaming mode (clicking on the image changes the selected object). You must click on the name to enter editing mode.
2. Do the same for the Untitled Test and rename it to PS1.
At this point, the document view displays the tree and object at the same time. Since you are planning to work only with the object view, it would be nice to have a larger screen area to with which to work.
Select Object Only from the View menu. The Object View now displayed on the whole client area of the document view.
At this point, the document view displays the tree and object at the same time. Since you are planning to work only with the object view, it would be nice to have a larger work area on the screen.
1. To add another test, highlight Test #1 in the Tests
View (PS1) and then select Test After
![]() from the Insert
menu or from the standard toolbar. A new test is inserted after PS1.
from the Insert
menu or from the standard toolbar. A new test is inserted after PS1.
2. Rename the new test from Untitled Test to PS2.
The document view should now look as illustrated in the figure below:

While you have added the tests, you have not set any test properties. To learn how to set the test properties, see Test Properties.