A toolbar is a row, column, or block of on-screen buttons or icons. When these buttons or icons are depressed, procedures or certain functions of the application are activated. ATEasy implements the toolbar as a form control called AToolBar ![]() . It is used to access functions of a form or procedures bound to that form.
. It is used to access functions of a form or procedures bound to that form.
To create a toolbar, click on the AToolbar ![]() control in the Controls toolbar, and then drag on the form background to the size desired.
control in the Controls toolbar, and then drag on the form background to the size desired.
To put buttons on the toolbar, select the AToolbar control which you have created and go to the Properties pages. Select the "Buttons" tab.

Click in the listbox at the top left corner of the properties page. Click on the Add button. Enter your name for the button in the resulting text box. A button has now been defined, and you can set its other properties. Define the other buttons using this procedure. Use the Move Button Up and Move Button Down buttons to change the order of the buttons. Order is significant, because the buttons will be displayed on the toolbar in left-to-right order, corresponding to their order in the listbox.
You can then set whether the button is enabled or disabled; if it is disabled, the image used will be the image from the "disabled" set, and the button cannot be pressed on the form. You can also set whether the button is visible or not; this is useful if you want to eliminate a button temporarily for debugging purposes.
The Caption property will appear as a text label under the button in the form.
You provide a supply of pictures for AToolBar buttons by linking the control to up to three AImageList controls. The AImageList control allows you to store a list of graphic images in a specific order for use in a form.
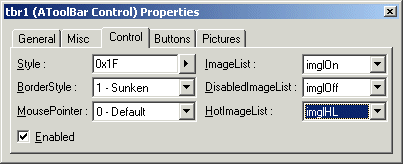
You select these ImageLists in the "Control" pane of AToolBar Properties. With the three drop-down lists on the right of the pane, select the ImageLists by their names.
At the least, you need to define one AImageList (ImageList)consisting of the images you want the buttons to have. You can define another AImageList consisting of the images for those buttons when they are disabled, the DisabledImageList, and a third AImageList, HotImageList, for those buttons when the mouse passes over them. (This "hot image" behavior is the same as can be seen in Microsoft Internet Explorer™ when you pass the mouse over a toolbar button.)
NOTE: The "hot images" effect will only work if you have defined the toolbar buttons' Style option value in the "Control" pane of AToolBar Properties to be either Flat or RightAligned.
The order of images in all three image lists must be the same. ATEasy expects the first button in the ImageList to correspond to the first button in the DisabledImageList, which in turn must correspond to the first button in the HotItemsList.

Once you have specified your image lists in the "Control" pane, you can assign individual images to individual buttons. You do this in the "Buttons" pane of AToolBar properties. Select a button by clicking on the button name in the left-hand list box. Then, using the drop-down Images list on the right, select the image which you would like to correspond to that button.

Now that you have defined AToolBar buttons and defined which images will be associated with them, you can link actions to them. These actions will be executed when the buttons are pressed.
There are two ways of linking actions to buttons:
Using Menu commands.
Using the Case statement.
In a form where you have both an AToolBar control and a menubar, you can set each AToolBar button to execute a menu command. Each menu item in the menubar should have a procedure linked to it using its OnClick() event.
In the "Control" pane of the AToolBar Properties, select a button from the listbox and enter the name of the menu item into the Menu Command box. This menu command will now execute when the button is clicked.
Alternatively, you can use the case statement to execute menu commands. You can do this using the OnButtonClick() event of the AToolBar control. There is only one such event for the entire toolbar. However, using the case statement, you can check which button has been pressed, using the pButton parameter which is passed with the event. Once you detect which button has been pressed, you can execute the appropriate menu command.
