The GT-DIO System has two types of circuit boards:
● Master – The Master board can be connected to a maximum of seven Slave boards. Each Master board contains a Timing Module attached to an Input-Output Module.
● Slave – Each Slave board contains only an Input-Output Module.
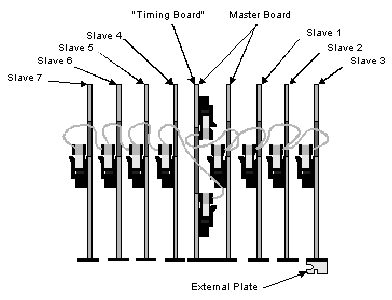
Master and Slave Input-Output Circuit Boards with Cable Attached
The following steps are required before the board(s) can be installed in the PC. Each one of these steps is explained in detail in a following section.
1. Verify the terminator jumpers are in place.
2. Set the base address.
3. If required, install or upgrade SIMM memory.
4. If required, install the Timing Control Module on the Master board.
5. Install the board inside the PC.

When installing, verify the terminator jumpers are installed, with JP1 and JP2 near J5, (see the Figure GTxx-DIO Boards Layout). Only the last input-output Slave board in each daisy chain should have terminators installed (see Figure Master and Slave Input-Output Circuit Boards with Cable Attached). If only the Master board is installed, then the jumpers should be installed on this board (see figure Master Circuit Board with Timing Control Module).
For each Master or Slave board, set the address by setting the Dip switch S1 on the I/O module (see figure Input-Output Circuit Board Showing Switch S1 set to I/O Address 0 x 310). Each board occupies four unique addresses in the PC I/O address space. For example, a system with a Master and a Slave board can be installed at 0x310 (hex 310) for the Master and 0x314 for the Slave. You must make sure no other board in the system uses this I/O space before setting the base address.

Input-Output Circuit Board Showing Switch S1 set to I/O Address 0x310.
The following table shows the value of each switch in S1 when set to the OFF position.
Switch # |
Decimal |
Hex |
Switch 8 |
512 |
200 |
Switch 7 |
256 |
100 |
Switch 6 |
128 |
80 |
Switch 5 |
64 |
40 |
Switch 4 |
32 |
20 |
Switch 3 |
16 |
10 |
Switch 2 |
8 |
8 |
Switch 1 |
4 |
4 |
Switch Values with Switch S1 in Off Position
For example, for address 0x310 (default) switches 8, 7, and 3 should be in the OFF position (0x200+0x100+0x0010).
SIMMs (single in-line memory modules) are plug-in memory modules containing the chips required for input, output and control memory in the DIO system. A minimum of three SIMMs (one bank) is shipped pre-installed with each board to accommodate all three types of memory. Each memory type has specific sockets the SIMMs can be installed in, as listed in the table below.
Memory Type |
Reference Designators |
Output |
SM 1 - 4 |
Input |
SM 9 – 12 |
Control |
SM 5 - 8 |
Memory Type and Sockets
The following table describes the appropriate SIMM sockets for each number of banks:
# of Banks |
# of SIMMs |
Socket |
1 |
3 |
SM1, SM5, SM9 |
2 |
6 |
SM1, SM2, SM5,SM6, SM9, SM10 |
3 |
9 |
SM1, SM2, SM3, SM5, SM6, SM7, SM9, SM10, SM11 |
4 |
12 |
SM1, SM2, SM3, SM4, SM5, SM6, SM7, SM8, SM9, SM10, SM11, SM12 |
SIMM Socckets
The board contains twelve sockets for SIMM installation and each socket is labeled (see figure GTxx-DIO Boards Layout). Be sure to select the appropriate socket for the SIMM. Additional SIMM banks may be installed to upgrade memory, up to a total of four banks.
The following section explains how to install SIMMs memory on the GT-DIO board.
1. Select the appropriate SIMM socket (see the table above).
2. Carefully set the SIMM (as shown in figure SIMM Module Installation) into the appropriate socket at a 45 degree angle using both hands, tilting upwards (refer to figure SIMM Module Installation - Side View). Do not force the SIMM into the socket. The SIMM module has a notch in the lower right corner. This notch prevents incorrect installation. If you are having difficulty installing the SIMM module, make sure you are not installing the module backwards.


SIMM Module Installation- Side View
3. Confirm the module is centered and the module’s connector pins are aligned with the socket connector pins.
4. Once the SIMM module is correctly seated, use both hands to push the module to an upright position to lock the module into the socket. Make sure both locking tabs are in place.
Note: Damage to the SIMM module and/or socket may result if proper insertion guidelines are not observed. SIMMs are extremely sensitive to static electricity. When installing SIMMs, follow the instructions at the beginning of this chapter under the Caution heading.
The Timing Control Module is usually pre-installed on the I/O module of the Master board (see figure Master Circuit Board with Timing Control Module). The following installation procedures explain how to install the timing module in case it has not been installed already:
1. Connect the 20 pin flat cable to J3 on the Timing Control Module (see figure GTxx-DIO Boards Layout).
2. Connect the other end of the 20 pin flat cable to J5 on the I/O module (see figure GTxx-DIO Boards Layout).
3. Insert the plastic screws in the Timing Control Module (see figure Timing Control Module Installation) and install the spacers (see figure Timing Control Module Installation - Side View).
4. Connect J2 on the Timing Control Module to J4 on the I/O module, making sure that the screws are inserted properly in the I/O module (see figure GTxx-DIO Boards Layout).
5. Place the nuts on the screws to connect both modules (see figure Timing Control Module Installation - Side View).

Timing Control Module Installation

Timing Control Module Installation – Side View
Install the GTxx-DIO boards as follows:
1. Turn the PC off and unplug the power cord.
2. Remove the PC cover.
3. Locate a free 16-bit slot on the PC motherboard. Free slots must be available to accommodate the number of boards in the DIO system. If multiple boards are to be installed, the free slots must be continuous (one after the other) since the boards will be daisy-chained.
4. Each expansion slot has a rear panel opening at its end for mounting I/O connectors. Unused slots have a metal plate covering this opening. Remove the screw holding the plate and remove the cover plate. Save the screw.
5. Carefully insert the GTxx-DIO board into the expansion slot and fit the connector through the rear panel opening.
6. Insert the card edge into the motherboard card receptacle.
7. Use the screw from the cover plate to attach the mounting bracket to the rear panel, holding the board firmly in place.
8. Connect the 20-pin daisy chain flat cable to the other Slave board(s). If more than four boards are being installed, use two cables (see figure Master and Slave Input-Output Circuit Boards with Cable Attached).
9. Slide the PC cover back on and reattach it to the chassis.
10. Plug the power cord in and turn on the PC.
DIO broads may also be used in GTXI-700 or GT7700 chassis. However, the GTXI form factors and connectors are different than PC board slots. The DIO board is first configured and then mounted on a GTXI ISA carrier (GT7020) to adapt the DIO board for GTXI-based instrumentation.
DIO boards are configured as above for a PC installation with these exceptions:
● After configuration, each DIO board is mounted on a carrier.
● Each carrier’s offset address must be set before installing it in a GTXI slot.
● The Timing cable is strung through carrier perforations before inserting the carrier into the GTXI chassis. There is no overhead access or clearance for connecting Timing cables into installed carriers.
Carriers are then inserted into GTXI-type chassis using special procedures. Refer to your GTXI documentation for further information on mounting ISA boards on GTXI carriers and configuring carrier board offset addresses.
Note: GTXI carrier boards (GT7020) should not be confused with GT5900 carrier boards used in PCs. These boards are physically and functionally very different.