Note: This article was modified to reflect the latest ATEasy version (v10 156d, added Online activation). Please follow this even if the ATEasy clients are older version of ATEasy.
The server application, License Server (ALicenseServer.exe), must be installed in a computer that will be the ATEasy license server. The License Server computer must be a 32/64 bit Windows Operating System (Windows XP (sp3), Windows 7, 10, 11, or Windows Server 2003, 2008, 2012 or 2016, 2022, or newer, Virtual Machine installation is supported but only with online activation). The computer must be turned ON and connected to the network while the clients are running. Clients must be authenticated to the server to be able to retrieve licenses. We recommend to install it on one of the company servers (typically Windows Server) since it always turned on.
Setup the License Server- Download the latest ATEasy from ATEasy Product Page, it always best to use the latest ATEasy even if your license applicable to older ATEasy versions.
- Run the ATEasy Setup program at the server computer as an administrator privileges user. Select Custom setup type.
- Select the License Server option, un-check all the other options (unless you intend to run ATEasy on that machine).
- After the setup is complete, the License Server icon will appear in the Windows Taskbar and will be added to the server services. You can verify the service being installed by right clicking My Computer icon on the server and selecting Manage and then followed by Services under Services and Application. The ATEasy License Server should be displayed in the list.
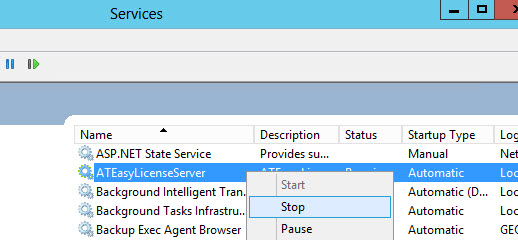
Install the License Key in the server- Stop License Server: Open Windows Services (Start, Run, Services.msc), Right Click on ATEasyLicenseServer and select Stop.
Verify that no ALicenceServer.exe instances are running by other users logged in to the machine using the Windows Task Manager Details page, if there are, you can safely close their instance using the End Task button.
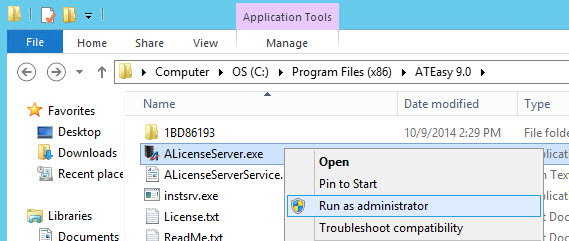
- Open Windows File Explorer and change the folder to ATEasy folder (i.e., C:\Program Files (x86)\ATEasy 9.0\), right click on ALicenseServer.exe and select Run as Administrator
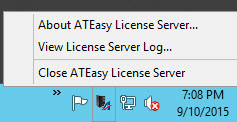
- Click on the ATEasy icon in the Task Bar and select About ATEasy License Server.
- Click the Set License button to display the License Setup dialog box.
- For Offline activation (computer have no internet access): Select Install Network License, an ATEasy Computer ID is displayed in the bottom field. The ATEasy Computer ID is used to identify the machine where the license is installed. With the ATEasy Computer ID and Serial Number printed on your ATEasy CD or purchase order, create a Magic support incident using your existing or create an account if you don't have one https://www.marvintest.com/magic/ to obtain a license string. Once you receive the license string, open the License Setup dialog box again as explain the prior steps. Paste the License String or File. Click OK.
- For Online activation (computer have internet access): Select Activate License Online, Enter your marvintest.com account email, password and the ATEasy Serial Number. Click OK. Note: Server must have access to https://www.marvintest.com/* at all time in order to operate correctly.
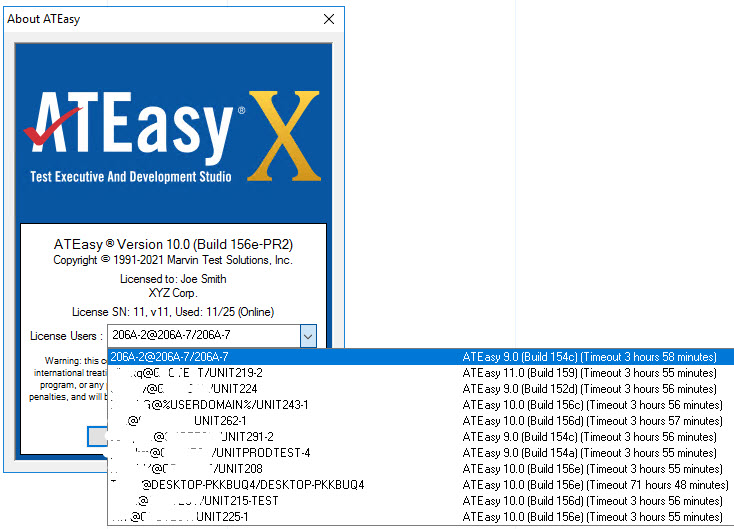
- The About dialog should display the # of license installed. It also shows the connected users and computers names they were connected from, the ATEasy version, and the remaining timeout period as shown here:
- Close the license server and Start the service again.
Setup the ClientPerform these steps only after you have obtained and installed the license string or file on the server.
Client must be authenticated to the server (usually member of the domain).- Install ATEasy at the client workstation, using the ATEasy Setup program.
- Open the License Setup dialog box from the Help, About menu or if no license is found the dialog box should show.
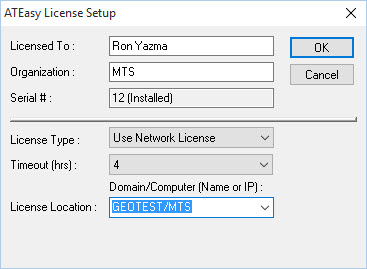
- Select Use Network License from the License Type list.
- Select the server name from the License Location list. If the server is not displayed leave the dialog open for a few minutes to the server list to populate or type the server name (DomainName/ServerName for example: GEOTEST/SERVER1). If the name does not work, you can also type the Server IP address directly (requires ATEasy v148c or newer) instead of the name, for example 10.10.1.6/10.10.1.6 where 10.10.1.6 is the server IP.
Note: ATEasy v8 148b or older requires that the server name will be shorter than 15 characters, if it longer, create a DNS alias entry with smaller name. The client/server communicate using Windows Named Pipes protocol that uses ports 137 and 139 UDP and potentially 445 TCP.
- Select the Timeout that your client can borrow a license from the server when no or bad connection to the server or you are traveling out of the office (available on ATEasy v9 152c or newer).
- Click OK to complete the setup.
Viewing Usage HistoryAt any time, you can view the license usage history by opening the license log file. The file, ALicenseServer.log, is a text file that resides in %ProgramData%\MarvinTest Solutions\ATEasy (C:\ProgramData\Marvin Test Solutions\ATEasy) folder. You can open the file by right click on the ATEasy License Server icon in the task bar or using Windows Explorer. Here is an example for license usage records:
- Authorize License,Wed May 6 09:33:08 2020,Success,Client=Tester@DESKTOP-VMRP0HL/DESKTOP-VMRP0HL ATEasy 10.0 (Build 156d) (Timeout 4 hours 0 minutes) Copies=50 Used=11
- Release License,Wed May 6 09:37:10 2020,Success,Client=JohnX@DOMAIN1/UNIT291-2 ATEasy 9.0 (Build 154c) (Timeout 3 hours 57 minutes) Copies=50 Used=10
- Authorize License,Wed May 6 09:37:48 2020,Success,Client=JoeM@DOMAIN1/UNIT291-2 ATEasy 9.0 (Build 154c) (Timeout 4 hours 0 minutes) Copies=50 Used=11
Removing the License ServerPerform these steps to terminate the ATEasy license and remove the license server from a system that was previously serving licenses.- Terminate the license using the steps found in the Terminate an ATEasy Software License article found linked at the bottom of this article
- Close all ALicenceServer.exe instances using the Windows Task Manager Details page by selecting instances and clicking the End Task button.
To uninstall all ATEasy elements:- Open the Uninstall a Program or Add or Remove a Program app, locate your version of ATEasy and select Uninstall
- Follow the ATEasy Setup Dialog prompts to remove ATEasy and the License Server
To uninstall only the License Server:- Open the Uninstall a Program or Add or Remove a Program app, locate your version of ATEasy and select Modify
- In the ATEasy Setup Dialog, select Modify, and Uncheck License Server
- Hit Next to complete the modification
See AlsoATEasy Licensing Q&A.
Terminate an ATEasy software License.
Installing, Upgrading and Acquiring ATEasy Software Licenses.
|