OverviewSimulation is the emulation or imitation of one or more components of a test system during code development or operation of the system. This includes simulation of:Often while developing test programs, an engineer is face with the challenge of writing test code for missing instrumentation. Typically, compiling and running test programs with missing or malfunctioning hardware will result in run-time communication errors. Simulating the missing or malfunctioning hardware allows the code developer to compile and run programs without producing error conditions that can be a nuisance to work around, allowing code flow to be tested sooner and optimized more efficiently.
Where test development is divided among multiple engineers, simulation allows concurrent code development among a team of software developers. In this instance, the system hardware is often a limited resource (i.e., one system but many programmers), but need not be a development limitation. Linking code development to system access creates an unnecessary bottle-neck that can dramatically reduce productivity and lengthen time to deployment. Developing, debugging and running an application on a desktop, sans the hardware, frees up system time, provides better resource utilization and speeds up development and debugging times. Then, when hardware becomes accessible, the time spent with the hardware can be more focused, allowing this limited resource to be used more efficiently.
A further benefit of simulation within the ATEasy environment is the ability to trace and analyze the performance of your code, and the performance of the instruments when running in the system. ATEasy allows combined use of instrument simulation and instrument control simultaneously. A simulation routine can place timing structures around the instrument commands to measure performance of the instrument while in operation. This is accomplished without modifying the instrument driver or otherwise impacting the test program. Once performance parameters have been established, the simulation can simply be disabled, allowing the program to run normally. No code changes are required.
ImplementationTo support a full, robust simulation, ATEasy v9.0 introduces several new Simulation Procedures and Simulation Properties, as listed below:- AApp.Simulate Property: Set or return the application’s Simulation Mode property; True - simulation is turned on, False - simulation turned off. Default is False.
- SetSimulateProcedures (sProcedureOrSubModule): Defines the procedure, IO table, or module to be simulated. You can pass in a module shortcut name, sub-module name or a procedure included within the sub-module. Note, SetSimulateProcedures() should occur before any ATEasy calls of an instrument API procedure or IO Table.
- OnSimulate (obModule, procCallee, penSimulateStatus) Event: Occurs when a defined procedure or IOTable is called while in simulation mode (App.Simulate=True), where:
- obModule: The module object that initiated the OnSimulate event. The module has various properties associated with it, one of which is obModule.Name. The property obModule.Name refers to the name of the module object that initiated the OnSimulate event. Example obModule.Name=“DMM” implies the name of a DMM driver module.
- procCallee: The name of the Procedure within the module object that initiated the OnSimulate event. Example "DMM.SetFunction" indicates that the OnSimulate event was initiated by the “SetFunction” procedure contained within the “DMM” driver module.
- penSimulateStatus: Enumerated status indicating how to proceed with the simulation handling, where:
- enSimulateDone: Simulation handled, return to caller
- enSimulateCallNext: Simulation not done, call next handler
- enSimulateCallSimulated: Call original simulated callee
- GetSimulateParameter (sParameterName ): Returns a pointer to the parameter referenced in the intercepted API procedure, allowing you to set or return the parameter value of the callee procedure. Example, “p=GetSimulateParameter("pdMeasurement")” returns a pointer to the pdMeasurement parameter referenced in the API procedure that initiated the OnSimulate event.
As with all structured processes within ATEasy, simulation uses events to control the simulation process – specifically, OnSimulate Events. Runtime access to the instrument API’s is accomplished by redirecting procedure calls to the simulation code contained in the OnSimulate event. The redirection is selective by identifying, or registering which instrument API’s to redirect. This is done using SetSimulateProcedures(), and is typically done very early in the applications execution. The redirected procedure can be any type of procedure within the ATEasy application, including IO tables, user defined procedures or DLL procedures linked to the ATEasy application. Also supported are redirecting all procedures within a sub-module name or module shortcut.
To activate the redirection (enable simulation), the application property “Simulate” must be enabled (set to True). This can be done from the Conditions menu, or programmatically using the App.Simulate property. When a simulated API procedure is called, ATEasy redirects control to the OnSimulate event. Here, the programmer has access to the name of the module containing the calling API procedure (obModule), the name of the procedure itself (procCallee), and the procedure’s parameter list (using GetSimulateParameter). The programmer is free to define any level of procedure simulation, from very simplistic, to very complex, depending on what is required. The process for simulating an instrument is:
1. Set the project requiring simulation as the Active Project.
2. Add code to select the procedures, IO Tables or modules that are simulated. Recommendation; Add a driver to your system that takes care of the simulation processes. This simplifies adding or removing simulation to a project.
3. Implement the OnSimulate() event to handle simulation.- Use the GetSimulateParameter() function to retrieve the pointer to the simulated procedure parameter(s). This can be used to set or access the value for parameters.
- Before returning from the OnSimulate() event, set the penSimulateStatus parameter to let ATEasy know what to do next.
Optionally, you can also:- Use the GetCallerName() to determine where the call was made from and what procedure called your simulated procedure.
- Use the Program, Task and Test internal variables to determine the location of the call within your program. This will allows you to return different values for different tests.
4. Turn ON Simulation and run/debug your application:- Turn on Simulation by Checking the Simulate from the Conditions menu
- Run your application with /simulate command -line.
- Set the App.Simulate property to TRUE (in code),
ExamplesBasic Simulation
This example demonstrates creating a driver to implement the instrument simulation. The first step after creating the new driver, is to define the instrument procedures that will be simulated. Figure 1 below defines that all of the Digital Multi-Meter (DMM) driver procedures and all of the Power Supply (PS) driver procedures will be simulated. Other simulation options for the DMM and PS drivers can be used, as shown in the commented code of figure 1.
Figure 1: Defining simulated procedures in the driver OnInit event
The OnSimulate event contains code to simulate the procedures that initiated the simulation event. In the example shown in Figure 2, the name of the calling module and the calling procedure are used to select the type of simulation response. Here, the DMM.Measure procedure is simulated to return the value “6.0” to the pdResult parameter, and the DMM.GetSystemIdentification procedure is simulated to return the string “34401A” to the psID parameter, masking the DMM Initialization Instrument ID Query error. Every different procedure in an instrument driver could potentially have a unique simulation process. At the conclusion of the simulated response, the simulation status is set to done, indicating no further action will be taken and control will return to the caller (penSimulateStatus=enSimulateDone).
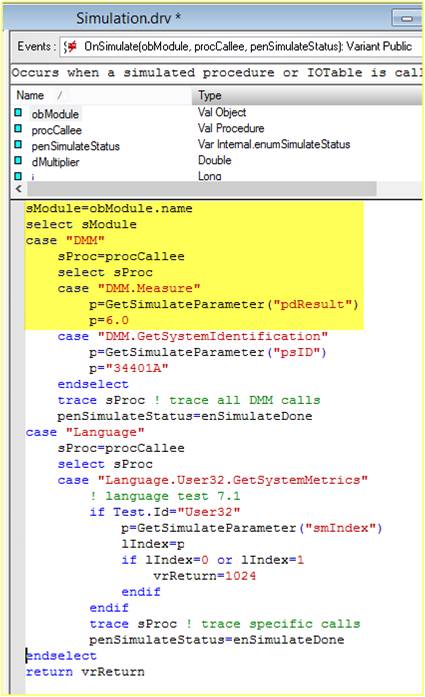 Figure 2 Figure 2: OnSimulate event in the simulation driver
To test the simulation, the simulation mode must be enabled (Figure 3) and a call to the DMM driver is required. In the ATEasy “DMM Test” (Figure 4), the test calls the DMM SetFunction and Measure functions. ATEasy will intercept both API calls, but specifically traps the measure function and returns the value “6.0” to TestResult via the “pdResult” parameter, as illustrated in the images provided (Figure 5).
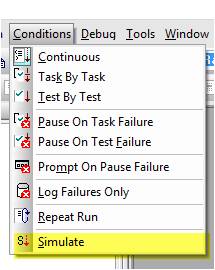 Figure 3 Figure 3: Enabling simulations from the Conditions menu
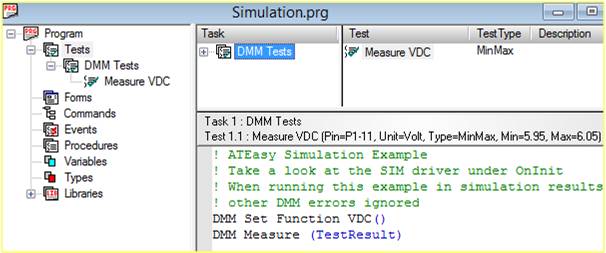 Figure 4 Figure 4: Testing the simulation
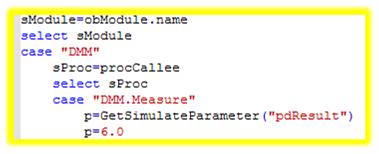 Figure 5 Figure 5: Simulating the Dmm.Measure function
To avoid confusing simulated tests from real tests, the simulation function in ATEasy has been further enhanced to indicate if a test run used simulated processes. The Test Executive report shown in figure 6 clearly identifies that the simulation mode was enable and operating during the tests.
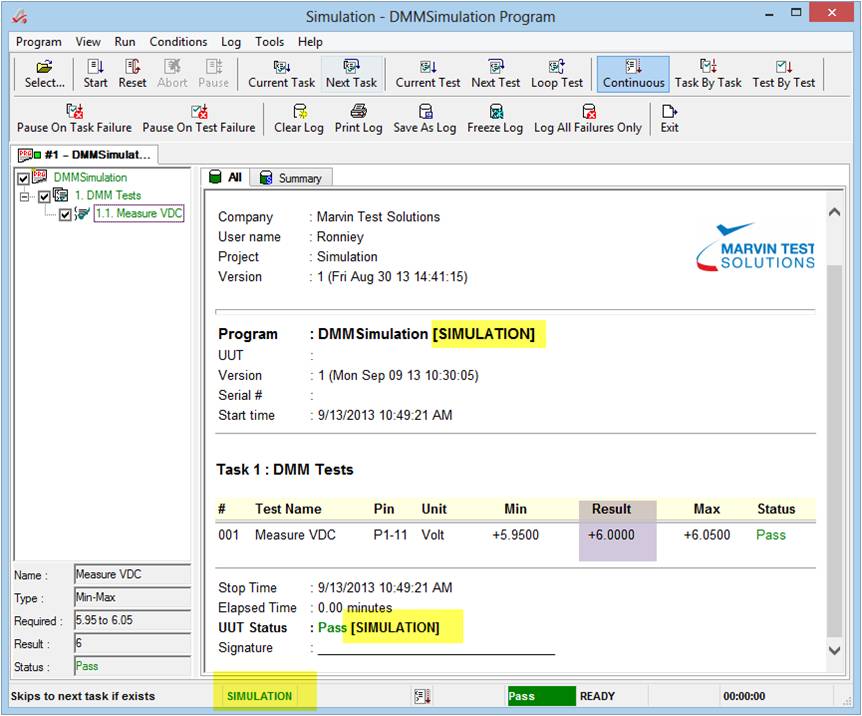 Figure 6 Figure 6: Test Executive showing simulated test results
Performance Measurement Simulation
This example demonstrates how to measure the performance of an instruments API. Calls to the instrument driver are maintained and communication with the instrument still takes place. The core of the performance measurement is achieved by surrounding the instrument's API call with the Tick() function. this provides a timestamp of the duration of the instrument procedure. The full performance simulation example is provide here:
Procedure OnSimulate(obModule, procCallee, penSimulateStatus): Variant Public ! Occurs when a simulated procedure or IOTable is called in simulation mode. -------------------------------------------------------------------------------- obModule: Val Object procCallee: Val Procedure penSimulateStatus: Var Internal.enumASimulateStatus pParm2: Any pParm1: Any lStart: Long sProc: String: 32 { If bIgnoreSimulate
penSimulateStatus=aSimulateCallSimulated
return 0 endif
sProc=procCallee
Select sProc
Case "GTDEMO.GtDemoRelaySwitch"
bIgnoreSimulate=TRUE
pParm1=GetSimulateParameter("enRelay")
pParm2=GetSimulateParameter("enRelayState")
lStart=Tick()
procCallee(pPArm1,pParm2)
lCountTime=lCountTime+Tick()-lStart ! total time
lCount=lCount+1 ! total calls
bIgnoreSimulate=FALSE Case "GTDEMO.GtDemoBuzzerSetState"
bIgnoreSimulate=TRUE
pParm1=GetSimulateParameter("enBuzzerState")
lStart=Tick()
procCallee(pPArm1)
lCountTime=lCountTime+Tick()-lStart ! total time
lCount=lCount+1 ! total calls
bIgnoreSimulate=FALSE EndSelect
Append sProc+" Time (mS): "+Str(lCountTime)
penSimulateStatus=aSimulateDone
Return 0 }
The program module that contains the Tasks and Tests that are used to call the instrument functions, and resulting test report are shown below:
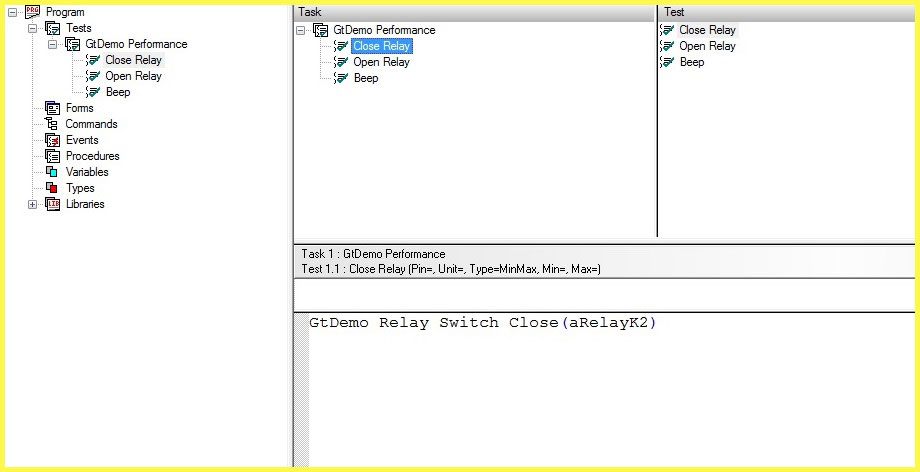
Figure 7: Calling the instrument functions from within a test
Figure 8: Performance measurements test results
Other Simulation TechnologiesIVI provides simulation that is configured using VISA resource manager (NI-MAX or Agilent VISA). To support simulation, you need to configure the resource manager with a different driver that was written especially to support simulation, only some vendors offers it. IVI simulation is designed to simulate drivers, to ignore errors, provide range checking for parameters and inject errors..When using an ATEasy IVI based driver that support simulation, ATEasy supports IVI simulation as well the same way as other development tools, ATEasy simulation is not specific to a technology (i.e. IVI) and can simulate any call including program, system, driver and UUT. It also does not require any external driver to be written, it provides additional benefits such as testing your application logic at any level, measuring performance and program flow, debugging tool . ATEasy simulation can also be injected to your application without changing any of your application exiting code.
ConclusionATEasy v9 simulation is a powerful feature and offers users the following benefits & capabilities:- Develop and verify test programs without needing valuable time on the tester or needing access to a UUT.
- Compile and run the test program without any hardware or UUT
- Supports concurrent test program development from multiple developers
- Trace and analyze test program performance
- Provides test engineering with a consistent way to characterize and validate test programs logic including parameters range checking, error injecting, return value and parameters, and more
|