IntroductionThe PXI/PCI Explorer is a PXI/PCI based VISA compatible resource manager control panel applet that provides the following features:
- Generates or maintain VISA PXI configuration files: PXISys.ini, PXIeSYS.ini
- Supports PXI specification's chassis, controller, and peripheral module ini files
- Displays device resources: IRQ, DMA, Memory, IO
- Displays device information: Slot, Device and Manufacturer ID, Alias
- Supports name or numeric alias for devices
- Displays PCI bus, bridges, slots and more
- Displays PXI slots with PXI symbols
- Displays and provides a way to change the current VISA status, resource and PXI trigger manager
- Notifies of available MTS software updates
- Exports PC/PXI system information for MTS diagnostics/troubleshooting
PXI/PCI Explorer is provided with the MTS (Marvin Test Solutions) HW driver - Hardware Access Software package that provides the services:
- Programming API used by instrument drivers to provide access to instrument configuration, memory, IO registers, DMA and interrupts resources
- Access to PCI/PXI instruments PC PCI / PXI bus devices and resources such as memory, IO registers, DMA and interrupts
- Windows device driver for PCI/PXI instruments. Supported Marvin Test Solutions instruments are listed in the HW.inf file
The MTS HW driver is included within all MTS software packages, including ATEasy and instrument drivers such as GxDmm, GxCnt, GtDio, etc. It is also available as a stand alone package.
To download the current HW software click here. |
|
PXI/PCI ExplorerTo open the Explorer application, click on the Windows Start button, Marvin Test Solutions, or double click on the desktop icon as shown below:

The MTS PXI/PCI Explorer contains three tabs: Slots, VISA and Status. The Slots tab displays the current hardware including chassis, buses, controllers and cards. The VISA tab displays the current installed version of VISA and allows the user to change the active resource and trigger managers. The Status tab contains a listing of the current PXI and PCI files needed to communicate with the installed hardware.
Slots TabThe Slots tab displays the current hardware, including all found chassis, buses, controllers and cards. The tab page consists of a tree view that opens to display the PXI System, Chassis and Slots contained in the system. The following is an example of the Slots tab on a Gx7600 chassis using the Gx7944 embedded controller.
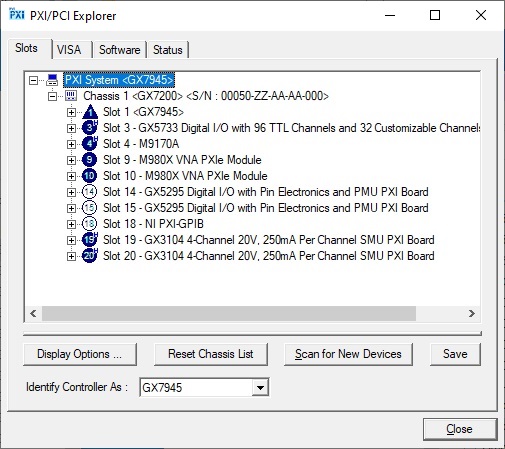 Figure 1: PXI/PCI Explorer Embedded Controller Figure 1: PXI/PCI Explorer Embedded Controller
PXI System Context Menu and Slots Tab ButtonsThe PXI System Context Menu is available by right clicking on the PXI system and selecting the desired option as shown below. There are 4 Buttons on the PXI/PCI Explorer Slots Tab: Display Options, Reset Chassis List, Scan for New Devices and Save. In addition is an Identify Controller As pull down menu. These buttons and pull down menu provide an alternate selection method to the PXI System Context Menu and are described below,
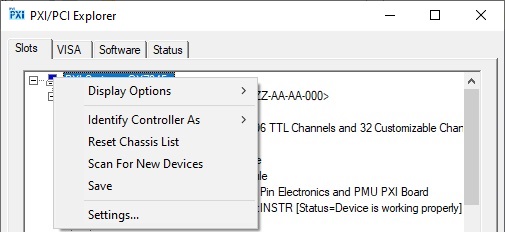 Figure 2: PXI System Context Menu Figure 2: PXI System Context Menu
Display Options: When selected brings up a list of options that can be selected to change the Slots page view. These devices include third party PXI devices as well as MTS devices, and any peripherals on the PCI bus. Any or all of these options can be selected. By default all PXI devices initially detected during panel startup are displayed.
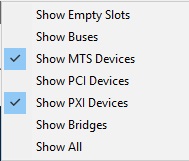 Figure 3: HW Display Options Figure 3: HW Display Options
Reset Chassis List: When selected forces the PXI/PCI Explorer to re-scan the PXI / PCI bus and displays the current devices and or new chassis found in the system. Pressing this button can also trigger an alignment of the cards below a chassis.
Scan for New Devices: When selected forces the PXI/PCI Explorer to re-scan the bus for any new PXI or PCI devices, but does not check for a new chassis. If new cards have been installed in the chassis or a device driver was just installed and the card still displays PCI device, pressing Scan for New Devices will reload the device list to show the current names of the installed instruments.
Save: After making any changes to the PXI/PCI Explorer, when selected settings are saved to the PXISys.ini file. If the settings are not saved to the PXISys.ini file, devices may not initialize or function properly when used.
Identify Controller As: The Controller is normally identified when the PXI/PCI Explorer is scanned however if this is in error the controller type can be selected manually using the pull down menu.
Populated PXI/PXIe Slots The Slots display information about the PXI/PXIe hardware found in the system. When expanded it displays the slot type, the current VISA status (If installed) and other board specific resources. This includes the slot number of the module, legacy slot, alias and folders that contain the current device and PXI settings. These resources can be displayed or in some cases edited as detailed below.
VISA Resource: The VISA resource is displayed along with its current status. The VISA resource number is comprised of the bus and device number of the module. In the case of the GX5295 installed in slot 9, the bus number is 4 and the device number is 12. The VISA resource name is normally used to initialize third party instruments that only support VISA however this name can also be used to initialize an MTS module using the MTS driver GxXXXInitialize function, where XXX is the mnemonic of the instrument such as DIO, CNT, DMM, etc. For example, Dio Initialize Master(1, 0, "PXI4::12::INSTR") initializes the GX5295 located in Slot 9. The VISA resource number is not editable.
nSlot: The nSlot number is comprised of the chassis (0x100) and the slot number (0x9). The value is displayed in hexadecimal. The nSlot number 0x109 indicates that the instrument is installed chassis 1 slot 9 and can be used to initialize the instrument using the MTS GxXXXInitialize function. The nSlot number is especially useful to initialize instruments in multiple chassis. For example, Dio Initialize Master(1,0x10⁹) initializes the GX5295 located in chassis 1, Slot 9.The nSlot value is not editable.
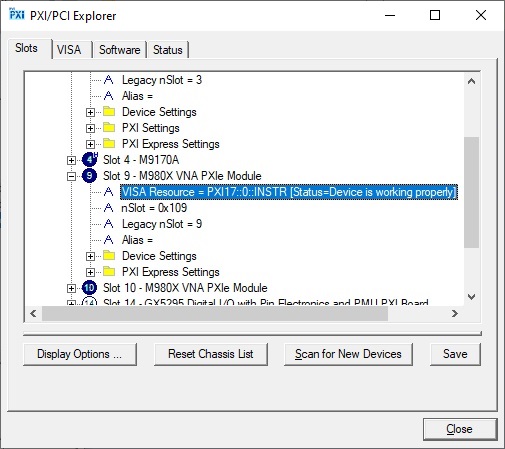 Figure 4: HW Visa Resource and nSlot Figure 4: HW Visa Resource and nSlot
Legacy nSlot: This number is by default the same as the nSlot number minus the chassis number (0x100) and is displayed in decimal. It can have a value of 2 - 255 or can be unassigned. This number provides a shortcut to initializing an instrument using only the Legacy slot number as apposed to using the nSlot number above, i.e. 9 instead of 0x109. For example, Dio Initialize Master(1,9) initializes the GX5295 located in slot 9. The Legacy nSlot number can be used to initialize any Marvin Test Solutions instruments using the MTS GxXXXInitialize function.
Since slot numbers are virtual constructs in PCI, it sometimes happens that when installing the instrument drivers, Windows resolves the slot number incorrectly. If this happens, the slot number can be edited by selecting the Legacy nSlot field and choosing the correct slot number from the combo box that appears below the buttons.
Using the Legacy nSlot number to initialize a module is also useful if an instrument is moved in the system causing the system configuration to change. Since the Legacy nSlot is virtual it can simply be remapped in PCI/PXI Explorer to match the existing test program and thus avoiding changes and or recertification.
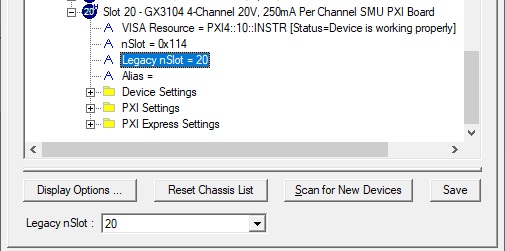 Figure 5: Select Legacy nSlot Figure 5: Select Legacy nSlot
Alias: An Alias can be used to identify an instrument using a name without having to define the location of the instrument. To add or change the Alias name, select the Alias field and type the desired name into the text box that appears below the buttons of the Slots tab. For example two Alias names DUT1 and DUT2 are defined in PXI/PCI Explorer below to be used as an example to initialize two GX5295's without specifying a device slot or VISA resource name.
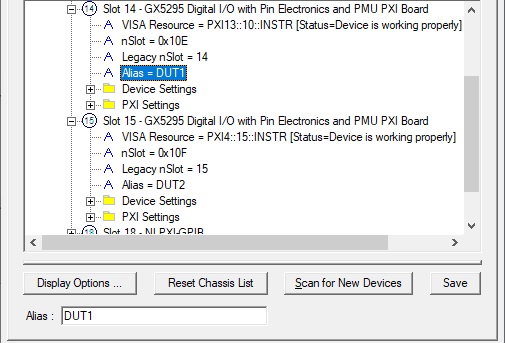 Figure 6: Using Alias Names in PXI/PCI Explorer Figure 6: Using Alias Names in PXI/PCI Explorer
To use the Alias names in an application the HW driver must be installed along with all other instrument drivers. If using ATEasy the HW driver is automatically initialized. If using third party software tools the user must call HwOpen() to initialize the HW driver. After adding the GX5295 driver be sure to set the Skip On Init variable to 1 to skip automatic initialization of the instrument. The following ATEasy procedure can be used to initialize two GX5295's using Aliases "DUT1" and "DUT2" as defined in PXI/PCI Explorer detailed above:
ATEasy Procedure DioAliasInit(): Void
-------------------------------------------
lSlot: Long
{
!Using an PXI-PCI Explorer Alias to Initalize the GX5295
!Use "Skip On Init" to disable automatic initialization of the GX5295
!The following procedure uses the HW and GX5295 driver functions,
!Long HwPciGetAliasChassisSlot(sAlias) Returns nSlot used by GXXXInitialize
!Void InitializeMaster(nMasterNumber,nSlot,sVisaResource) Master board Init
!Void HwOpen() is automatically called by ATEasy
!Initialization for GX5295 Master 1
lSlot = HW Pci Get AliasChassisSlot("DUT1")
Dio Initialize Master(1,lSlot,"")
!Initialization for GX5295 Master 2
lSlot = HW Pci Get AliasChassisSlot("DUT2")
Dio Initialize Master(2,lSlot,"")
}
For a detailed explanation of using Alias's to initialize MTS instrumentation refer to Knowledge Base article Using an Alias to address PXI instruments.
Device Settings: To view the Device Settings open the folder under the desired module. This folder displays the Bus, Device, Function, Device ID, Vendor ID and the memory allocated for the module. The information described in the Device Settings can be useful in finding specific modules in a chassis using the Device ID and the Vendor ID and the supplied HW driver.
The Device Settings can help to determine if the module has the correct resources allocated. For example, if no Memory is displayed, then the module was not allocated memory resources on system boot-up. In this case the device driver may need to be installed prior to installing the hardware to allow these resources to be allocated. A module may also have interrupts enabled, this would also be indicated in the Device Settings. The device settings are not editable.
 Figure 7: Device Settings Figure 7: Device Settings
The Device Settings can also be obtained programmatically using HW driver functions such as PciGetSlotDevice. The PciGetSlotDevice function can be used to not only provide information on all devices in a system but allow the user to write a driver using the information returned in the HWPCIDEVICE structure. The following is an ATEasy procedure that displays the Device Settings of all devices found in the chassis.
Procedure DisplayDeviceInfo(): Void
--------------------------------------------------------------------------------
lSlot: Long
nCntr: Short
stPciDevice: structHWPCIDEVICE
{
!DisplayDeviceInfo
!This example demonstrates using the HW driver library function HwPciGetSlotDevice
!to obtain PCI/PXI device configuration of each slot of a system. The variable
!stPciDevice is defined as a HWPCIDEVICE structure. The for-next loop prints
!the information found in each populated slot
Log.PlainText=True
ClearLog()
HW Initialize() ! Must be called before any HW call
HW Pci AssignDeviceSlot() ! Assign slots to all devices
for lSlot=0 to HW_MAX_SLOTS-1
HW Pci Get SlotDevice(lSlot, stPciDevice) ! Get the device in the specified slot
if stPciDevice.dwVendorId<>0 ! if populated slot, print the device info
append " Slot ";lSlot;" - Bus ";stPciDevice.dwBus;", Device ";\
stPciDevice.stPciSn.dwAsUlong and 0x1F;\
", Function ";(stPciDevice.stPciSn.dwAsUlong shr 5) and 0x7
append " - VendorID 0x";ucase(str(stPciDevice.stPciCfg.wVendorId, 16));\
", SubVendorID 0x";ucase(Str(stPciDevice.stPciCfg.stType0.dwSubVendorID, 16))
append " - DeviceID 0x";ucase(str(stPciDevice.stPciCfg.wDeviceId, 16));\
", SubSystem 0x";ucase(Str(stPciDevice.stPciCfg.stType0.dwSubSystem, 16))
for nCntr=0 to 7
select stPciDevice.aResDesc[nCntr].ucType
case 1
append " - Port: 0x";\
ucase(Str(stPciDevice.aResDesc[nCntr].Address1, 16));\
" Length 0x";ucase(str(stPciDevice.aResDesc[nCntr].Address3, 16))
case 2
append " - Interrupt: 0x";\
ucase(Str(stPciDevice.aResDesc[nCntr].Address1, 16))
case 3
append " - Memory: 0x";\
ucase(Str(stPciDevice.aResDesc[nCntr].Address1, 16));\
" Length 0x";ucase(str(stPciDevice.aResDesc[nCntr].Address3, 16))
endselect
next
endif
next
}
For more information on using the HW driver PciGetSlotDevice function and the HWPCIDEVICE structure refer to HW.h and Hw.drv files included on your system. In addition refer to Knowledge Base articles Scanning a PXI system to learn about system resources) and What is HW driver?.
PXI Settings: To view the PXI Settings open the folder under the desired module. This folder displays the Bus, Device, Slot Path, Local Bus Left and Local Bus Right and any External Backplane Interface.
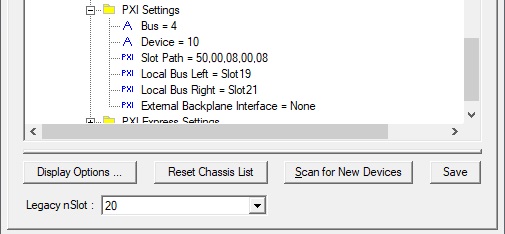 Figure 8: PXI Settings Figure 8: PXI Settings
VISA TabThe VISA tab allows the user to view the current VISA status as well as display or control the Active Resource Manager and the PXI Default Trigger manager, as detailed below.
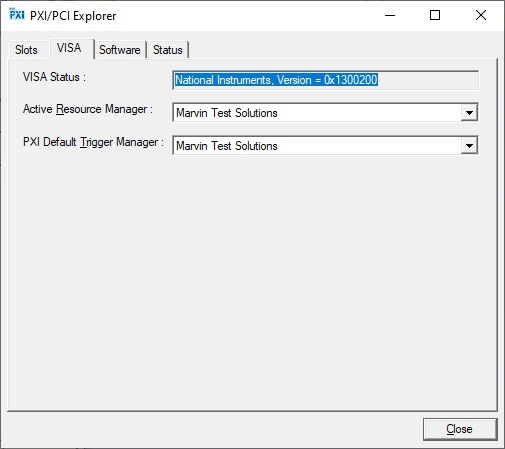 Figure 9: VISA Tab of PXI/PCI Explorer Figure 9: VISA Tab of PXI/PCI Explorer
VISA Status Displays the current status of VISA on the system. This includes whether it is installed, working properly and the current VISA version.
Active Resource Manager When using strictly 3rd party tools to control hardware it is recommended to select the 3rd party as the Active Resource Manager. When using Marvin Test Solutions software tools or 3rd party tools that are not listed in the drop-down menu it is recommended to select Marvin Test Solutions as the Active Resource Manager. This setting can be changed using the pull down menu to select the desired manager.
PXI Default Trigger Manager When using strictly 3rd party tools to control hardware it is recommended to select the 3rd party as the PXI Default Trigger Manager. When using Marvin Test Solutions software tools or 3rd party tools that are not listed in the drop-down menu it is recommended to select Marvin Test Solutions as the PXI Default Trigger Manager. This setting can be changed using the pull down menu to select the desired manager. If an application does not require triggering then this setting can be ignored.
Software TabThe Software tab allows the user to see all registered MTS software as well as the currently installed and latest available software versions. The user can also access upgrade links and configure how often they would like to check for upgrades.
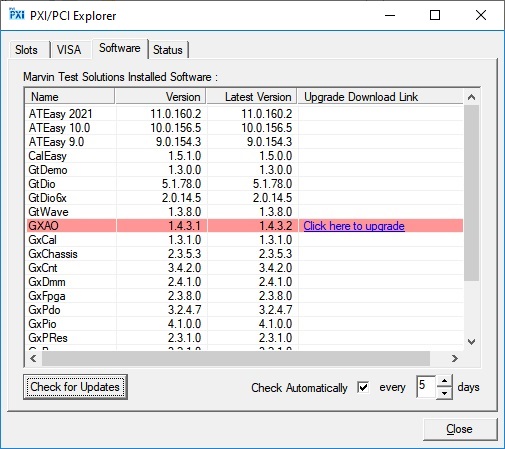 Figure 10: Software Tab of PXI/PCI Explorer Figure 10: Software Tab of PXI/PCI Explorer
Marvin Test Solutions Installed Software
This grid displays the list of all software currently registered on this PC alongside the installed version. The information is pulled from the local Windows registry. The latest available software version is also displayed if the computer has access to the Internet. If the latest version is newer than the current version, a link will be displayed which will open the default web browser and open the product's software page where the user can download a setup installer.
Check for Updates
This button checks immediately for updates and provides feedback in the form of a pop-up message. PXI/PCI Explorer will check for updates once when the software is first launched and will perform automatic update checks if this feature is enabled.
Automatic update checking
If enabled, PXI/PCI Explorer will check for updates every X days as long as the PXI/PCI Explorer is open. To facilitate this, clicking the X button on the PXI/PCI Explorer main form will close the window but the software will continue to run in the Windows notification area.
Status TabThe Status tab displays the required PXI/PCI files. The files listed on this tab are used to provide communication to the hardware connected to the PXI, PXIe, PCI and PCIe slots instrumentation included in the system. An installation problem may exist if a named file is displayed and the file size and modified fields of that file name are empty. In that case it is recommended to reinstall the HW driver. The Status tab also displays the HW driver version number as well as the Driver / Service status.
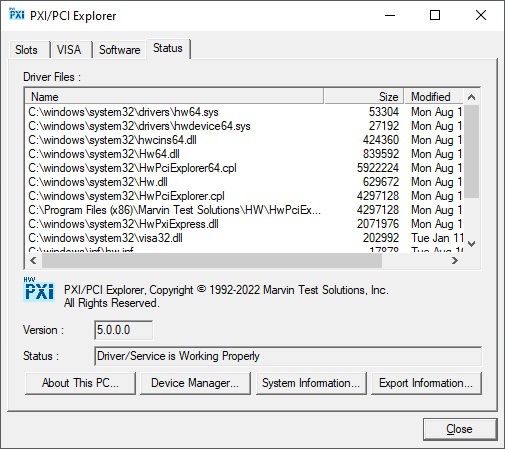 Figure 11: Status Tab of PXI/PCI Explorer Figure 11: Status Tab of PXI/PCI Explorer
Status Tab ButtonsThere are 4 Buttons on the PXI/PCI Explorer status tab: About This PC, Device Manager, System Information, and Export Information as described below.
About This PC This button opens the About PC Windows settings page. This allows users to view and or edit Windows Security settings, Device settings and Windows Specifications.
Device Manager This button opens Windows Device Manager utility. This utility allows users to view and or edit the hardware connected to the computer. This utility will highlight specific nonfunctional hardware and allows the user to install the proper hardware drivers.
System Information This button opens Windows System Information utility. This utility allows users to view or edit advanced information about Hardware Resources, System Components and the Software Environment.
Export Information This button opens a 'Save File' dialog when the user can specify the location of a zip file. This file will be created and filled with system information generated by the Microsoft System Information tool as well as all information that is presenting within the PXI-PCI Explorer Utility. This zip file can be used to provide valuable diagnostic information to MTS customer support engineers when troubleshooting an issue with MTS hardware and software.
Notification IconWhen the PXI/PCI Explorer is closed by clicking the X button in the top-right corner, it will minimize to the Windows Notification area. From here, it can continue to perform periodic checks for software updates if this feature is enabled.
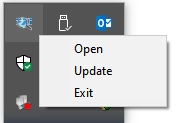 Figure 12: PXI/PCI Explorer Notification Icon and menu Figure 12: PXI/PCI Explorer Notification Icon and menu
When the notification icon is right clicked, a context menu will provide three options:- Open: Opens the PXI/PCI Explorer main form.
- Update: Initiates an immediate update check, re-opens the PXI/PCI Explorer main form and switches to the software page.
- Exit: Closes PXI/PCI Explorer. Automatic update checks will stop until the next time the application is launched.
ConclusionPXI/PCI Explorer is an application that is used to view and modify PXI and PCI bus configurations. This application is also a tool to help users easily identify, troubleshoot and correct issues with the hardware in a system. For more information on the HW driver refer to Knowledge Base articles, Scanning a PXI system to learn about system resources), Using an Alias to address PXI instruments and What is HW driver?.
|