OverviewATEasy is a test executive and a rapid application development framework for functional test, Automated Test Equipment, data acquisition, process control, and instrumentation systems, providing all the necessary tools to develop, deploy and maintain software components, as well as a complete and customizable test executive.
Test engineers have several commercial options available to them when choosing the best platform to standardize on for writing test programs. And while there are also commercial test executive development packages available, most are a collection of tools with which engineers can assemble a test executive.
ATEasy comes bundled with a full-featured test executive that runs out-of-the-box with no coding necessary, exploiting ATEasy’s structured applications to dynamically build a user interface tailored to the test processes. And because ATEasy was developed for test engineers, it has many of the processes common to test programs built into the system – like measurement evaluation and data reporting. |
|
That is not to say that the ATEasy Test Executive is rigid and inflexible when customization is warranted. In fact, since the ATEasy Test Executive was written in native ATEasy language, the full source code to the test executive driver is provided so the user has complete control over adding new functions, or altering the look, feel and functionality of their application.
ATEasy supports easy integration into the test executive of unique user procedures and functions, including user defined menu additions and tool bar images to support those functions. This article will demonstrate the process for adding custom functions, commands, menu’s, forms and tool bars.
Custom Test Executive ProcedureThe first step in customizing the test executive is to add code that represents the required functionality. The code could be in the form of a procedure or function, and may include a graphical interface. As a representative example of custom functionality and place-holder for future code development, this example will add a simple procedure called “MySetTemp”. The procedure was added to the System module, and will allow an operator to manually, or programmatically set an ambient temperature that will be recorded in the ATEasy Test Executive data log. Code for the procedure is below:
Procedure MySetTemp(dTempSetting): Void Public ! Sytem.MySetTemp -------------------------------------------------------------------------------- dTempSetting: [Val] Double = 0 sInput: String i: Long { If ArgMissing(dTempSetting) dTempSetting = m_dTempSetting
i = InputBox("Set operating temperature","Set Temperature",sInput)
If i = 2 ! Cancel
m_dTempSetting = dTempSetting Else
m_dTempSetting = Val(sInput) EndIf
Else
m_dTempSetting = dTempSetting EndIf
Print "Operating Temperature Set To: "+Str(m_dTempSetting)
}
The procedure will store a temperature to the System module variable “m_dTempSetting”. If the procedure is called from the program thread, and passed a value via the “dTempSetting” parameter, then the variable is updated without user intervention. If the procedure is called without the “dTempSetting” parameter, then a built-in user form will open requesting the operator to enter the temperature. Which ever method is used, the set temperature is stored in the System variable for use by the test executive. Make sure to set the procedure properties to Public and Compile as shown in figure 1.
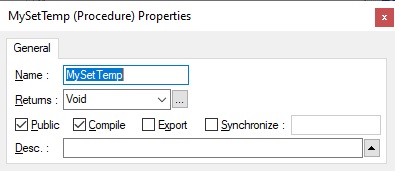
Figure 1 – MySetTemp Public and Compile properties
Test Executive Data LoggingThe System “OnInitProgram” event is used in this example to report the set temperature whenever the test process is initiated. This event is called each time the Program module (which contains the Task/Test list) runs. A simple print statement is used to inform the operator of the previously stored temperature, and because the statement occurs in the System OnInitProgram event, the information is located in the Program header section of the Test Executive log.
Procedure: OnInitProgram(): Void Public ! Syste.OnInitProgram, Occurs when a program has started. -------------------------------------------------------------------------------- { Print "Operating Temperature: "+Str(m_dTempSetting) }
Customizing the Test ExecutiveCreate Command Image
ATEasy’s Test Executive allows custom commands and images to be added to the existing menu, forms and toolbar. The image is a BMP image that will graphically represent the functionality of the added procedure. In this example, a 16 x 16 pixel BMP image was created using the Windows Paint program, and saved as “Thermometer.bmp” - see figure 2. This image will be used when adding the new function to the ATEasy's Test Executive Menu, Form and Toolbar.
 Figure 2 – Set Temperature Image Figure 2 – Set Temperature Image
Create New Test Executive Command
A new command must be defined to link the MySetTemp() procedure and the Set Temperature image to the Test Executive. While the application is running and the Test Executive is visible, click on Tools:Customize. The default tab should be "Commands". If it's not, select it. At the bottom of the command list is the "User Defined popup" selection. Click on this and using the "Insert New Command" tool, add a new user defined command as shown in Figure 3:A. Name the command "Set Temperature" (Figure 3:B). Since we will be adding this command to the Test Executive Menu, Form and Toolbar, change the Caption for each of these items to "Set Temperature" (Figure 3:C). Then add the description ""Set operating temperature" to the new command as shown in figure 3:D.
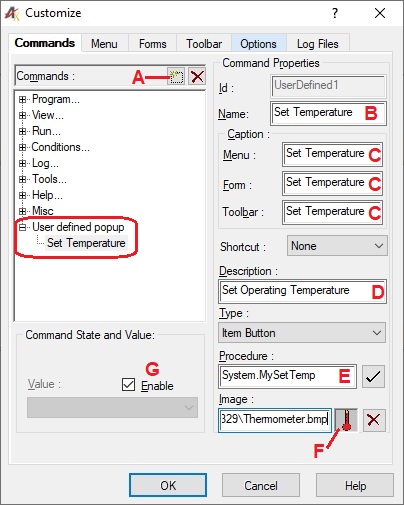 Figure 3 – Create New Test Executive Command Figure 3 – Create New Test Executive Command
To link the MySetTemp procedure to the newly created command, click in the Procedure field (figure 3:E) and enter the procedure "System.SetMyTemp" )Module.Procedure Name), then click on the check next to the field to accept the entry. If you make a mistake entering the procedure an error message will be dislayed.
To link the image to the command, click on the box next to the Image field to open up a navigation window. Navigate to the folder containing the BMP file previously created, and select the file (figure 3:F). The navigation box will display the image after successfully selecting the BMP image. The last step in defining the new Test Executiv command is to enable it by checking the Enable check box as shown in figure 3:G. When done the Test Executive Customize:Commands dialog should look similar to figure 3.
NOTE: The image navigation will use the absolute path when linking the image. If you intend to deploy your application and cannot guarantee that the installation path will be the same as the development path, you can manually substitute the absolute path with a relative path using this syntax: ".\image.bmp".
Create New Test Executive Menu Function
To add a new Menu item to the Test Executive, while still in the Tools:Customize dialog, click on the "Menu" tab. Expand the "User Defined popup" in the left side of the dialog and select the "Set Temperature" command you just created - Figure 4:A. Expand the "Log" item in the right side of the dialog, and select "Clear" (figure 4:B), then click on "Add" (figure 4:C) to insert the item selected on the left side of the dialog (user defined Set Temperature command), into the position selected on the right side of the dialog, bumping the selected item down on the list. The new item should be visible in the expanded Log function list (figure 4:D). The ordering tools above the right side function list can be used to change the position the functions in the list are displayed in the Test Executive Log Menu (figure 4:E).
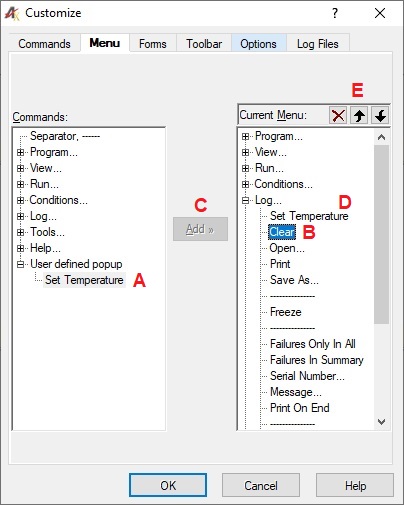 Figure 4 – New Test Executive Menu Selection Figure 4 – New Test Executive Menu Selection
Create New Test Executive Form Function
Test Executive forms are used when the Test Executive is set to operate in the Modal (Touch Panel) mode. Modal or Modeless operation can be selected from the Tools:Customize Options tab. Using the same process as was used to add a new menu item to the Test Executive, you can add our customer command and image to the Test Executive form.
From the Tools:Customize dialog, select the Forms tab. Expand the "User Defined popup" in the left side of the dialog and select the "Set Temperature" command you just created - Figure 5:A. Select "Log" from the drop-down list at the top of the dialog (figure 5:B). In the Main Buttons area, select "Clear" (Figure 5:C)), then click on "Add" (figure 5:D) to insert the user defined Set Temperature command into the position selected in the Main Button list, bumping the selected item down on the list. The new item should be visible in the expanded list (figure 5:E). The ordering tools above the right side function list can be used to change the position the functions in the list are displayed in the Test Executive Log Form (figure 5:F).
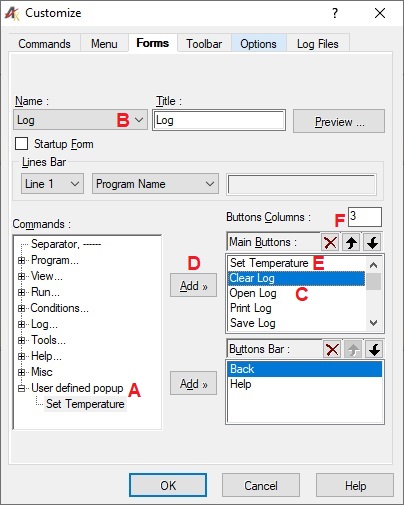 Figure 5 – New Test Executive Form Selection Figure 5 – New Test Executive Form Selection
Create New Test Executive Toolbar Function
To add the new command and image to the Test Executive toolbar, click on the "Toolbar" tab and expand the "User Defined popup" on the left side of the dialog. Select the "Set Temperature" command - Figure 6:A. Click on "Program exit" on the right side of the dialog to select it (figure 6:B), then click on "Add" (figure 6:C) to insert the item into the position selected on the right side of the dialog. The new item should be visible in the expanded Log function list (figure 6:D). The ordering tools can be used to change the position the functions when displayed in the Test Executive Toolbar (figure 6:E).
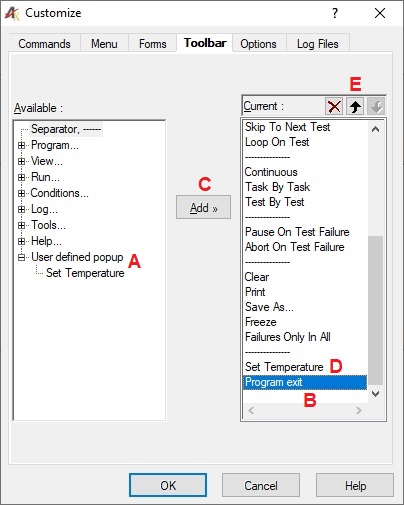 Figure 6 – New Test Executive Toolbar Selection Figure 6 – New Test Executive Toolbar Selection
Using The New CommandsTo use the new function, while the Test Executive is running, you can select it from any of the three Test Executive interface it was linked to, Menus, Forms (when running in Modal mode) or Toolbars. You can also call the function from within a test program. If a temperature parameter is included in the call, then the function executes silently (without operator interaction). If the parameter is omitted, then an operator prompt allows a temperature value to be manually entered, the same as if the function were initiated via the Menu/Form/Toolbar interface - as shown in figure 7.
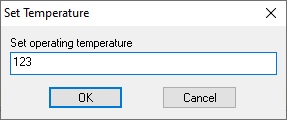
Figure 7 - InputBox For Manual Temperature Input
Examples of both programming methods are shown below. This code was placed in the Program OnInitTask event, and demonstrates user the input method for Task2, and silent temperature updating for Task 3.
Procedure OnInitTask(): Void Public ! Program.OnInitTask, Occurs when a program task has started. -------------------------------------------------------------------------------- { Select Task.Name Case "Task 2"
System.MySetTemp() Case "Task 3"
System.MySetTemp(98.6) EndSelect }
Examples of using the set temperature function from the Test Executive Menu/Form/Toolbar interfaces are provided below
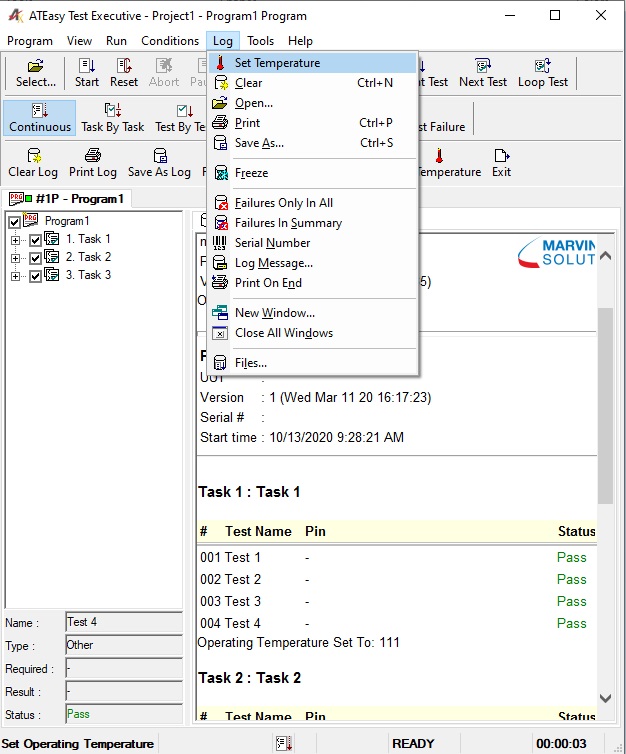 Figure 8 - Using Set Temperature From The Test Executive Log Menu Figure 8 - Using Set Temperature From The Test Executive Log Menu
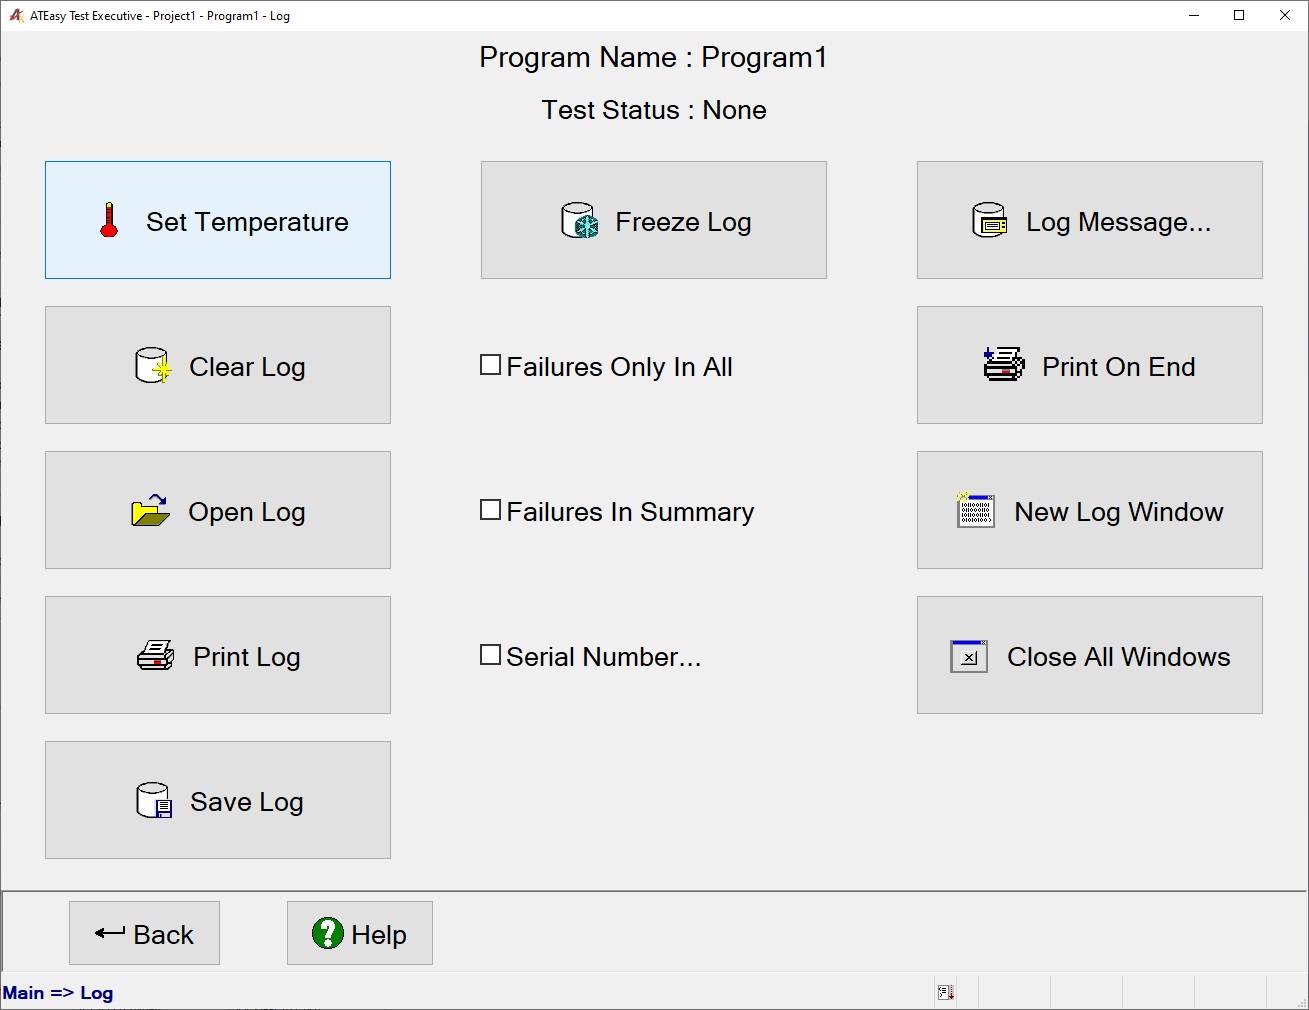 Figure 9 - Using Set Temperature From The Test Executive Modal (Touch Panel) Log Form Figure 9 - Using Set Temperature From The Test Executive Modal (Touch Panel) Log Form
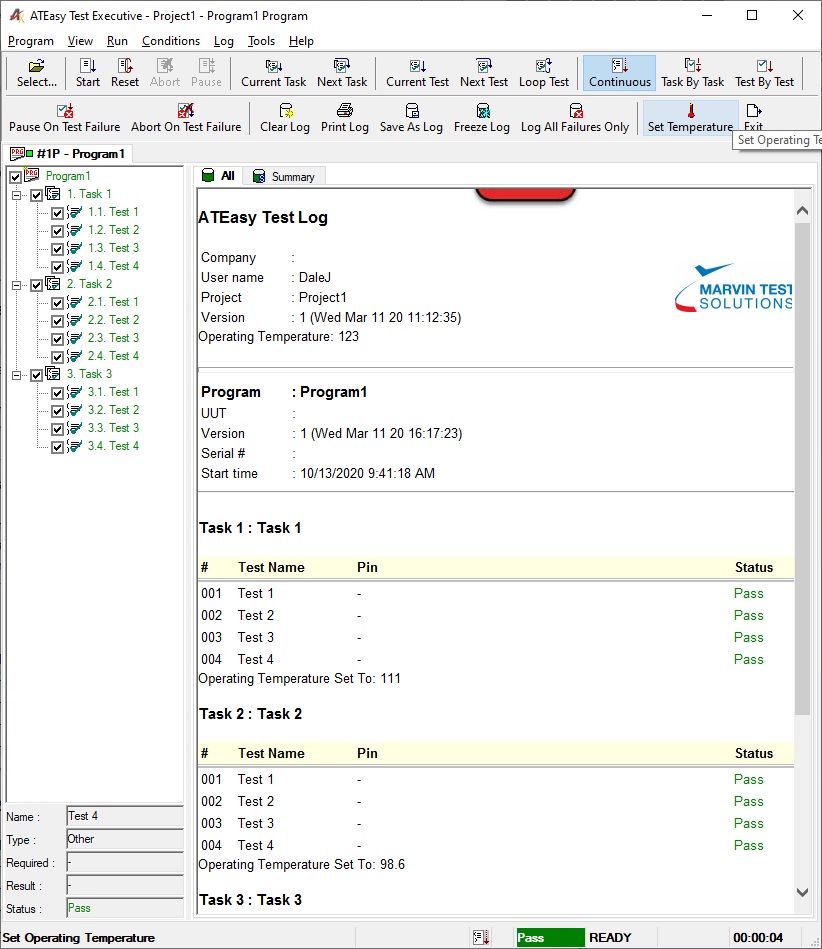 Figure 10 - Using Set Temperature From The Test Executive Toolbar Figure 10 - Using Set Temperature From The Test Executive Toolbar
Test Executive Data LogThe following is a sample test log documenting the temperature values stored in the m_dTempSetting System module variable. The initial value was set using the toolbar to enter a value of 123 before running the application. When the test is initiated, the System OnInitProgram event is executed, the initial value of 123, stored from the toolbar entry, is displayed. Prior to Task 2 starting, the operator is prompted to enter a new value, and responds by entering the value of 100. This new value is documented before to the Task 2 header. Prior to Task 3 starting, the program automatically updates the m_dTempSetting System variable, and the new value is documented at the beginning of Task 3.
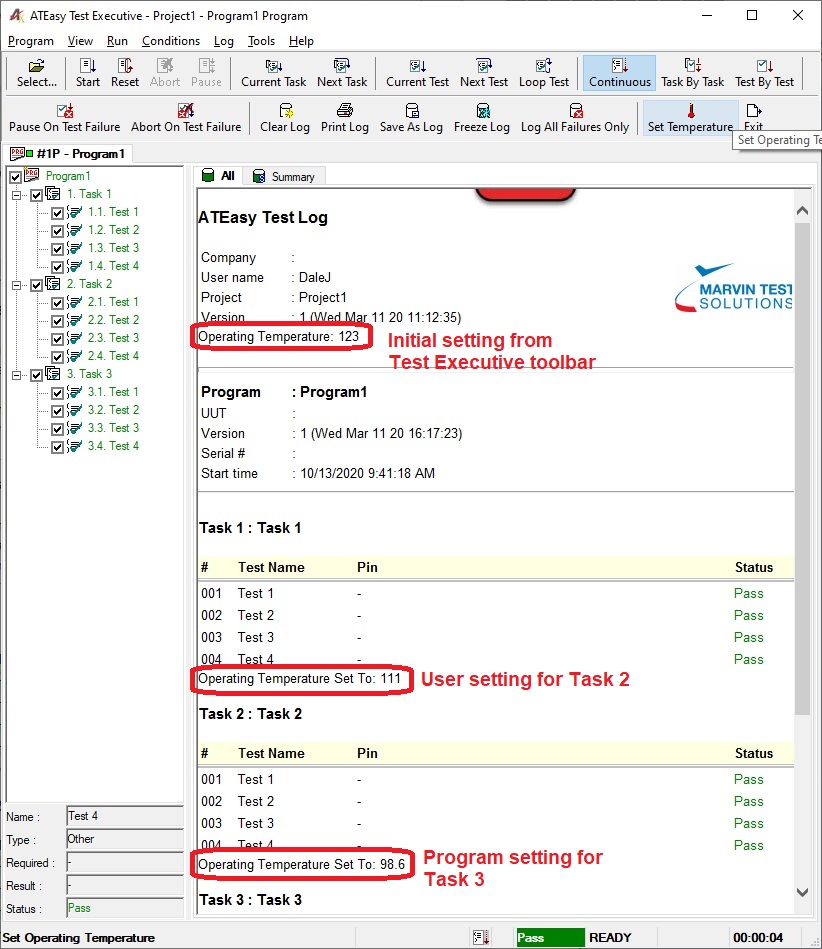 Figure 11 - Test Executive Test Log Output Figure 11 - Test Executive Test Log Output
SummaryThis article demonstrates the process for creating user defined functions, and integrating them into the ATEasy Test Executive. The example presented, while simple in concept, can serve as a template for adding more, and more varied functions. It's important to note that the functions can be ported to other ATEasy platforms, but to invoke them, you must either follow the setup process of creating commands and linking them to the Test Executive interface as described here, or, as the setup is saved to the "ATEasy.usr" file, you can copy the .USR file from the initial development system to multiple deployment systems and bypass creating and linking the commands on each deployment system.
Note: When copying the .USR file to a new system, ATEasy will detect the new .USR file and prompt the operator (must be ATEasy administrator) to accept using the new .USR file, or revert back to the .USR file currently in use.
The ATEasy project used to develop this article can be downloaded from the link below. The application was developed using ATEasy 10.0, build 156d
ATEasy Custom Toolbar Example (zip)
|